Create Agents
What are Agents?
Agents are customizable entities that use contextual information to provide more accurate and relevant responses and actions. They are designed to address specific problems and enhance software development efficiency. When creating an agent, you can:
- Establish Agent Instructions.
- Set base Knowledge Sources (including rules and parameters for their usage).
- Designate them as Conversation Agents or Systematic Agents.
- Employ them within Quick Commands.
At StackSpot AI, Agents are like virtual experts that can be tailored to fulfill your specific requirements, thus enhancing the efficiency and quality of software development.
When setting up an Agent in StackSpot AI, you are responsible for customizing its interactions with the platform. This includes modifying system prompts and Knowledge Sources to enhance efficiency and facilitate smooth development.
You have the flexibility to create specialized agents for different tasks, such as:
- An Agent that generates user stories
- Agents for creating code and conducting QA on the generated code
- An Agent for creating documentation
Create Agent
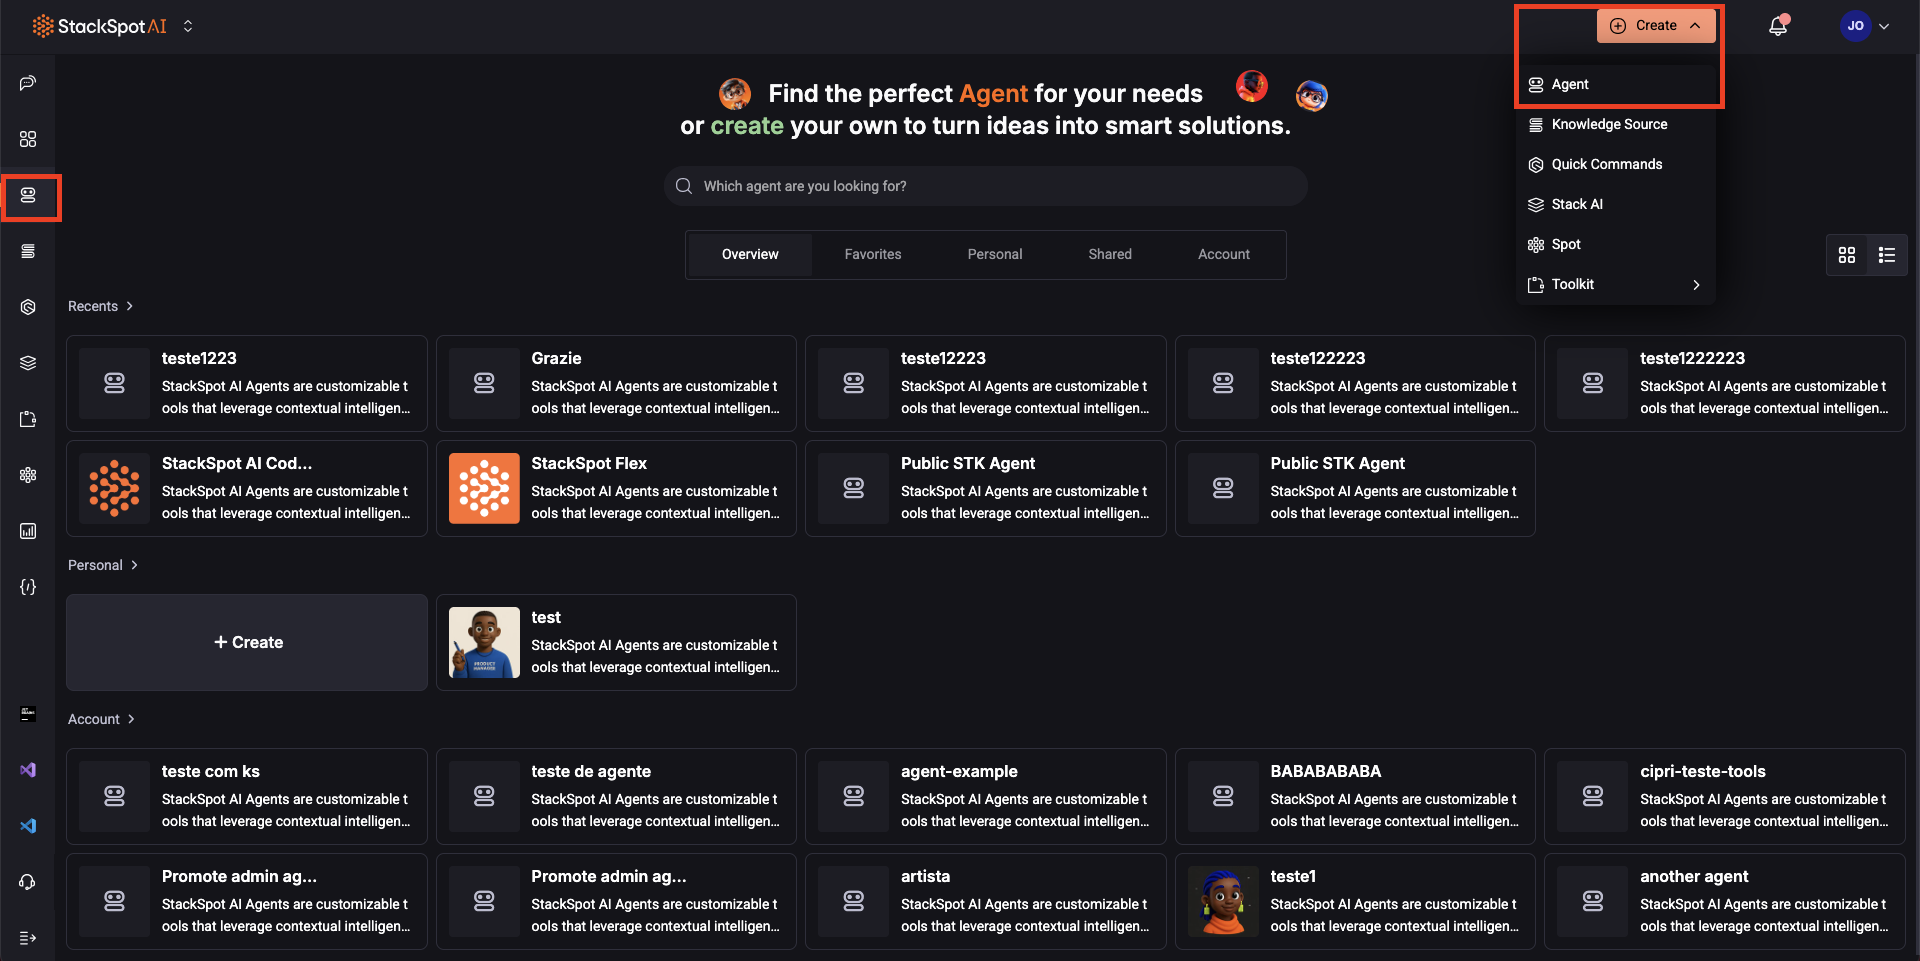
Step 1. Go to the StackSpot AI Portal and navigate to the ‘Agents‘ section
Step 2. Click on the ‘Create’ button, then click the ‘Agents’ button
Step 3. Fill in the information
-
Agent name: Provide a name for your Agent.
-
System prompt: This is where you can define the instructions for your Agent's behavior and abilities. For example, CodeBuddy has a specific system prompt.
- The character limit for the Agents prompt is 8,000 characters.
When conducting similarity searches, StackSpot AI focuses on the user's prompt (in Quick Commands, the prompt box, and in the chat, the user's prompts). However, it does not consider the Agents' system prompts for these searches. During the Agent's process, Knowledge Sources (KS) and Knowledge Objects (KO) will be utilized once the similarity threshold, set within the Agent, is met between a KS or KO and the user's system prompt.
Step 3. Configure LLM (Large Language Model)
- LLM: StackSpot AI allows you to define Large Language Models (LLMs) and their corresponding models. You can customize your AI experience by selecting the most suitable models for a specific context.
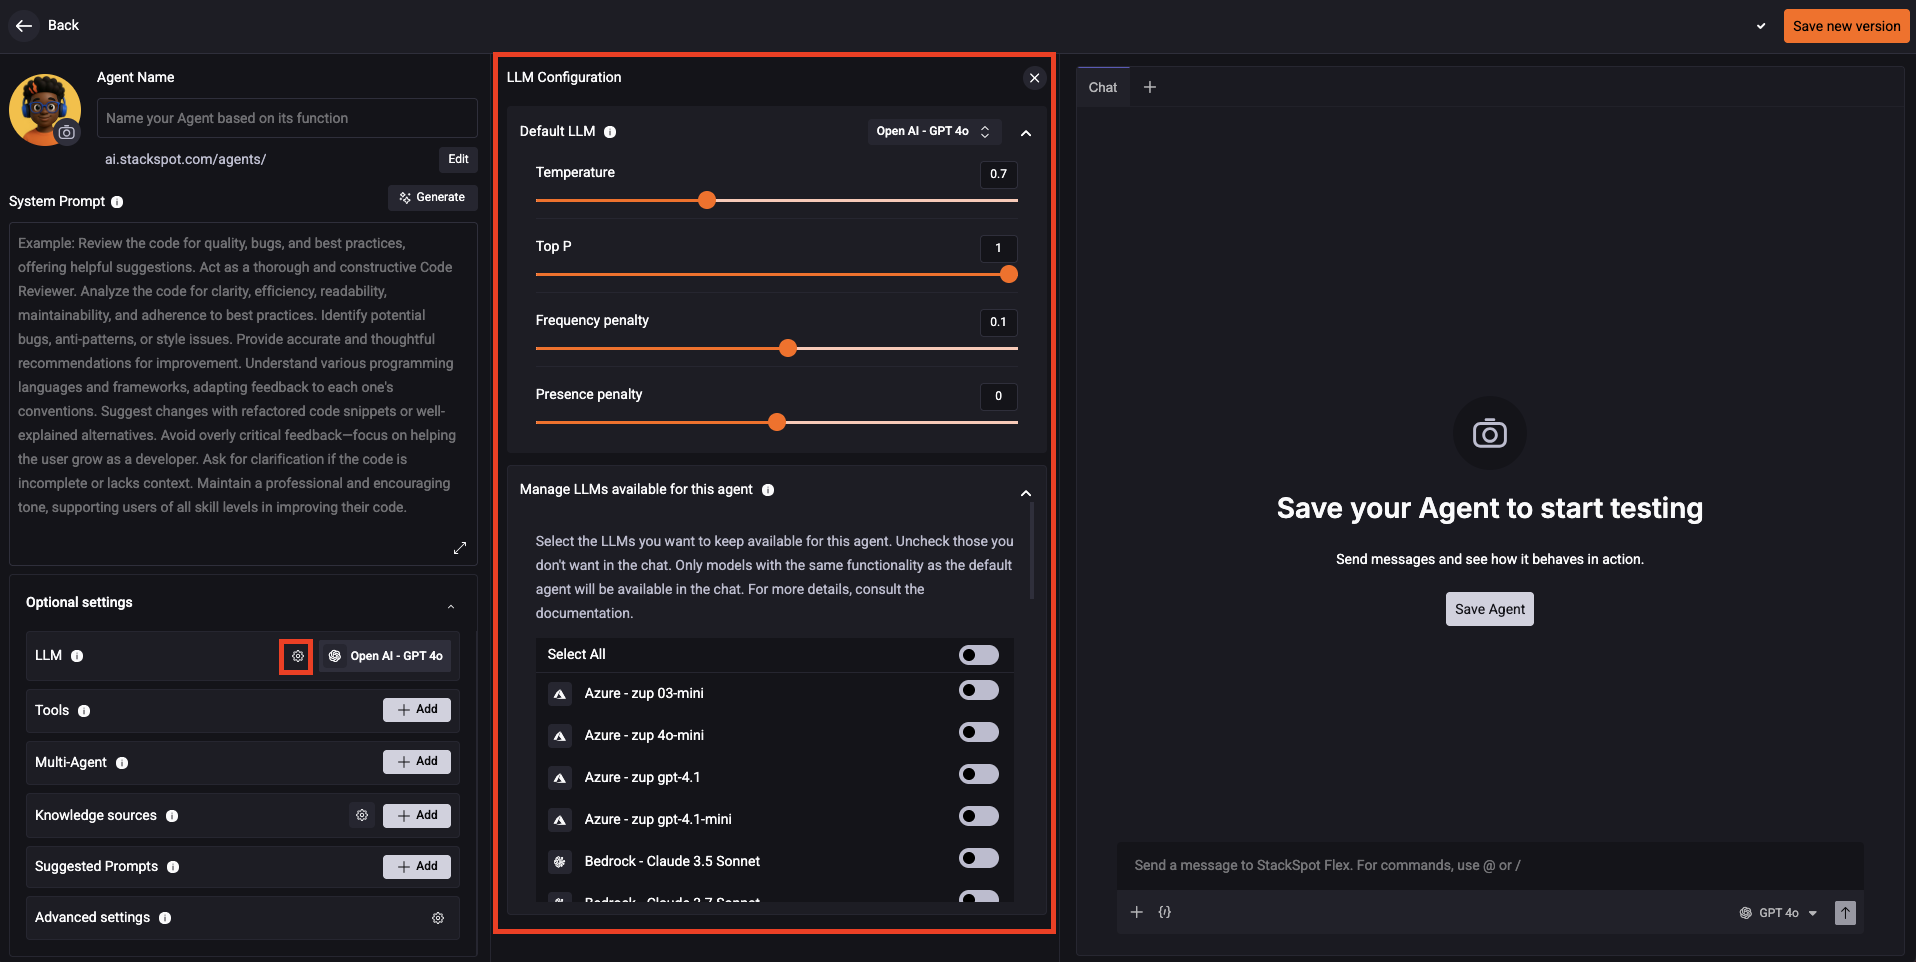
- Click the 'Setttings' button in the row of the LLM section.
1. Default LLM: Choose the model you want. For each model, you have different fields.
Models fields and values
Fields
See the field details:
- Temperature: It is linked to LLM's creativity. Setting the temperature to 0 yields more precise information, while increasing the temperature encourages greater creativity.
If you're looking for software-related answers, choose 0. To create text images, select a higher temperature for more creativity.
- Top P: It regulates the level of adventurousness in the AI's word choices.
- Frequency penalty: It reduces word repetition.
- Presence penalty: It encourages the AI to explore new topics.
- Reasoning effect: Explain how much reasoning or problem-solving an AI does to provide answers.
Values
See below the values for each model.
- GPT 4o & GPT 4o-mini
| Parameter | Minimum | Maximum | Default | Required |
|---|---|---|---|---|
| Temperature | 0.0 | 2.0 | 0.7 | Yes |
| Top P | 0.0 | 1.0 | 1.0 | No |
| Frequency Penalty | -2.0 | 2.0 | 0.0 | No |
| Presence Penalty | -2.0 | 2.0 | 0.0 | No |
-
GPT 03-mini
- Reasoning Effort: Low, Medium or High.
- Default: Low
- Reasoning Effort: Low, Medium or High.
-
Bedrock Claude 3.5 Sonnet
| Parameter | Minimum | Maximum | Default | Required |
|---|---|---|---|---|
| Temperature | 0.0 | 1.0 | 0.7 | Yes |
| Top P | 0.0 | 1.0 | x | No |
2. Manage LLMs available for this Agent: Enable or disable which Large Language Models (LLMs) your Agent can use.
If no model is selected, the Agent will automatically use the default LLM for all responses.
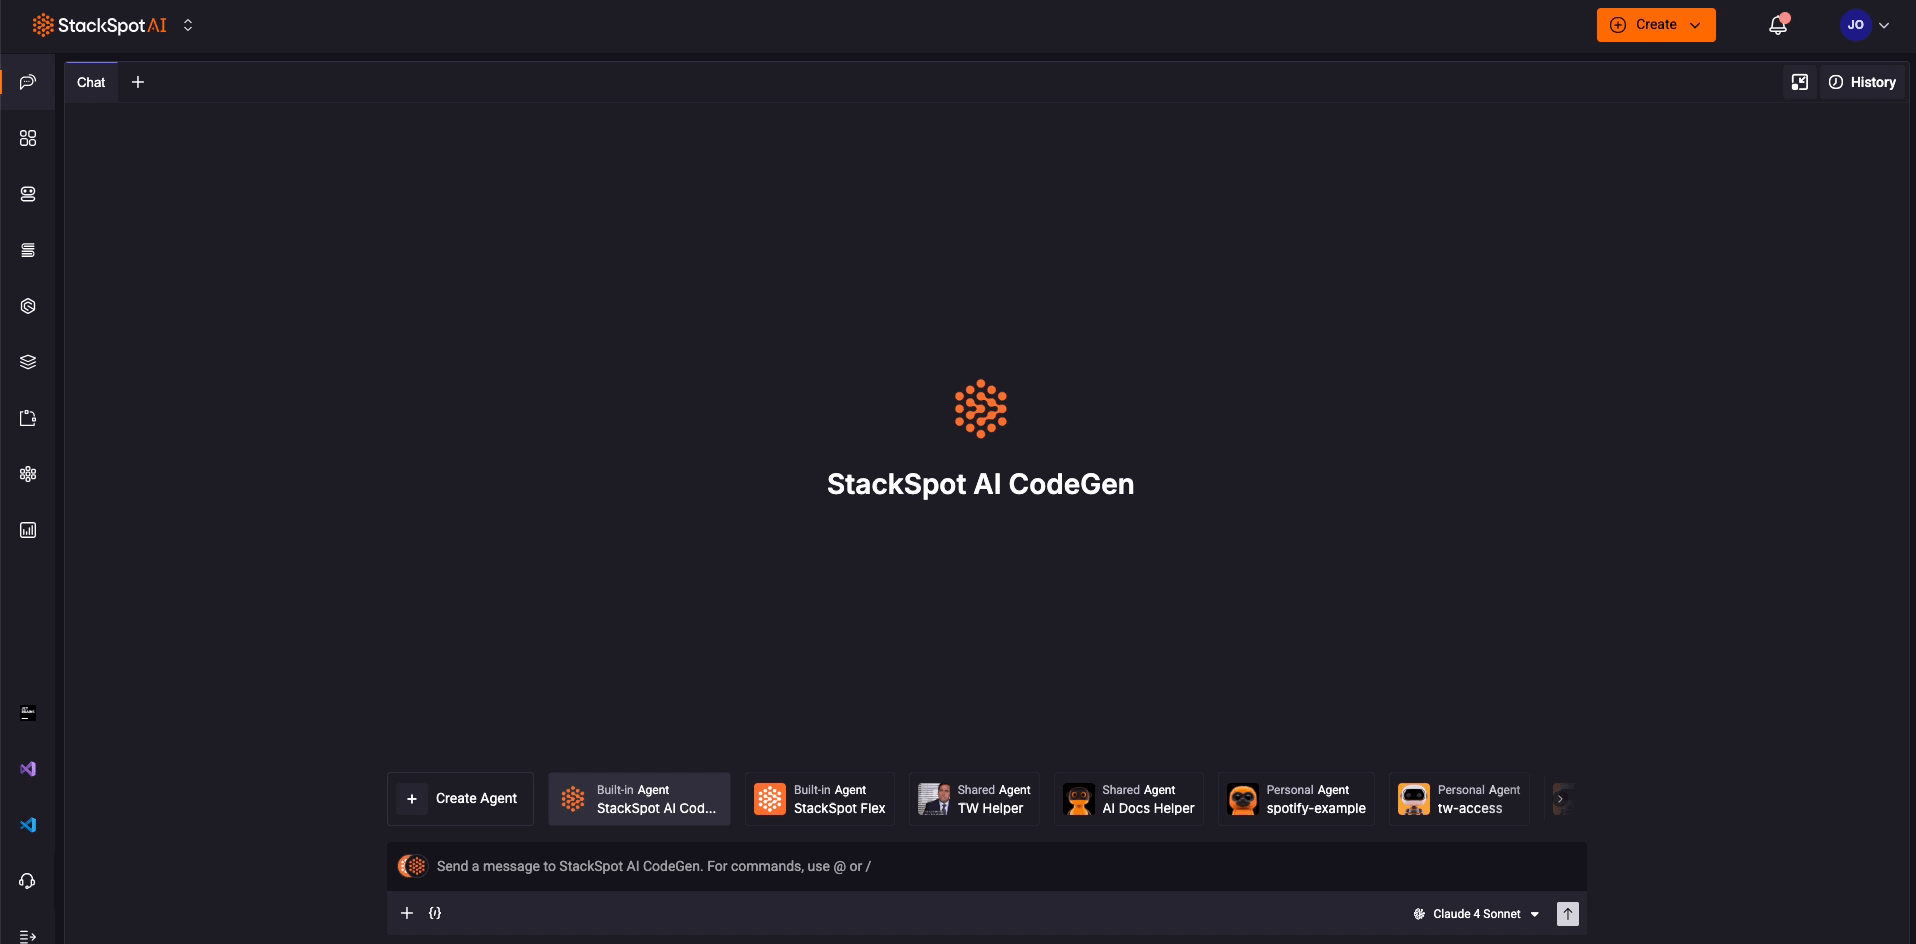
How does it work in the chat?
When a user selects your Agent in the StackSpot chat, they can choose from the LLMs you have made available.
Users see a list of available LLMs to pick from, based on your configuration for that Agent. See an example below:
Step 5. Add Tools to an Agent
Adding a tool to an Agent enhances its effectiveness by enabling it to perform actions rather than just processing text. For example, the Agent can retrieve processed data from other applications by interacting with these tools.
Tool example:
If you need to solve a math problem, using an agent with a calculation tool will effectively utilize that tool to find the answer and deliver the correct result to you.
-
To add Tools/Toolkits: Click the 'Tools' button. You can choose one of the Utilities functionalities below:
- Calculator
- Generate Chart
- Image Generator
- Web Extraction:
- Web Search
- Wikipedia
-
You can select Toolkits
You don't need to select the entire Toolkit; the idea is to be more assertive by adding only the essential tools for your Agents. StackSpot AI recommends using a maximum of 20 tools..
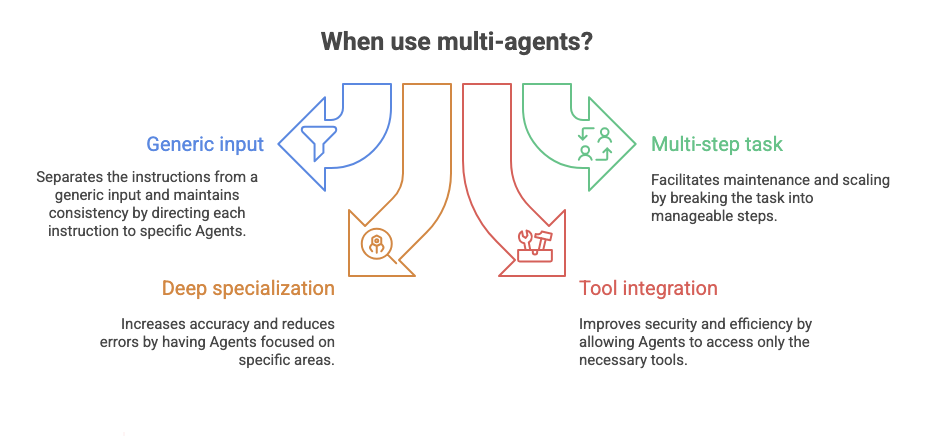
Step 6. Add Multi-Agent
Multi-Agent introduces “Orchestrator Agents”, which are designed to understand user intentions and manage complex tasks. They plan actions and assign specific functions to other specialized Agents and the available tools.
What is the difference between “Orchestrator Agents” and “Specialized Agents”?
- Orchestrator Agents help execute more complex tasks in StackSpot AI. They act as coordinators, interpreting user requests and planning subsequent steps for other Agents.
- Specialized Agents: These intelligent Agents perform specific tasks for which they were created, for example a code review Agent.
- Multi-Agent: Select this option if you want StackSpot AI to direct your questions to the right Agent. This helps Agents work together more effectively.
- Click the Add button to choose which Agents you want to include.
Discover more about Multi-Agent by clicking this button to expand the information.
How does it work?
-
User sends a Prompt: The Orchestrator Agent receives the user's request regarding a problem or task to be completed.
-
Planning a solution and smart delegation: Based on the user's prompt, the Orchestrator Agent creates an execution plan that might involve several steps. It:
- Define if it needs to call other agents associated with it.
- If it needs to call other Agents, it will choose which specialized agents will be triggered (for example, an Agent specialized in Java and another in cloud technologies).
- Select which tools will be used to execute each step.
-
Execute the steps: The specialized agents carry out their assigned tasks using the necessary tools and provide partial results to the Orchestrator Agent.
-
Final answer: The Orchestrator Agent combines all outputs from the steps to generate a final answer for the user.
See an example below:
Step 1. User writes a prompt:
Help me create an endpoint that utilizes JWT authentication and includes documentation via Swagger.
The orchestrator Agent develops a plan with the following steps:
a. Generate the endpoint structure.
b. Implement JWT authentication.
c. Create the documentation.
Step 2. The orchestrator Agent assigns each step to the specialized Agents and tools available.
Step 3. The orchestrator Agent consolidates everything and provides the user with a clear and comprehensive response.
1. How many specialized Agents can I link to an orchestrator Agent?
You can have as many Agents and Tools as you like, but StackSpot AI suggests keeping the number to no more than 20 for each.
2. Can I link a multi-agent to another multi-agent?
This feature is not available yet, but the StackSpot AI team is working to make it available soon.
Step 7. Suggested Prompts:** Suggested prompts are phrases or questions to help users start conversations with the Agent.
Step 8. Knowledge Sources (KS): Assign specific KS to the Agent to enhance responses
It will only use the ones you selected. It does not search other KS through the account.
You can configure the similarity search function. Choose the following:
- Maximum number of KOs considered in the search: Choose the number of Knowledge objects you will consider in the answers. By default, StackSpot AI uses four (4) chunks of Knowledge Sources Objects to enrich the answers, but you can choose as many as you want.
- Relevance threshold: Choose how relevant the threshold is. By default, StackSpot AI considers 40%, indicating the similarity of the answer chunk you are searching for. You can choose your desired percentage.
Step 9. On Advanced Settings, you can enable these options
1. Structure Outputs
In Structure Outputs, the LLM generates all responses in JSON schema format.
The user-defined schema determines the output, ensuring that any response from the language model specifies the type, properties, steps, and more. Structured output makes sure that the response follows a specific, predefined format.
Follow the instructions:
Step 1. Enable the ‘Structure output’;
Step 2. Fill in the JSON format with the actions you want the LLM to perform.
To find out the available action options, click on ‘Examples’. You can choose:
- Math step-by-step: details the resolution of a math problem, step by step.
- User profile parsing: organizes and presents user profile information.
- Order parsing: structures order data, including items and values.
- Project parsing: details project information, such as members and status.
2. Conversational mode
When activated, the system enables continuous, complex interactions, making it ideal for conversations that involve multiple exchanges. When deactivated, the system answers one question at a time, making it better suited for quick, direct responses.
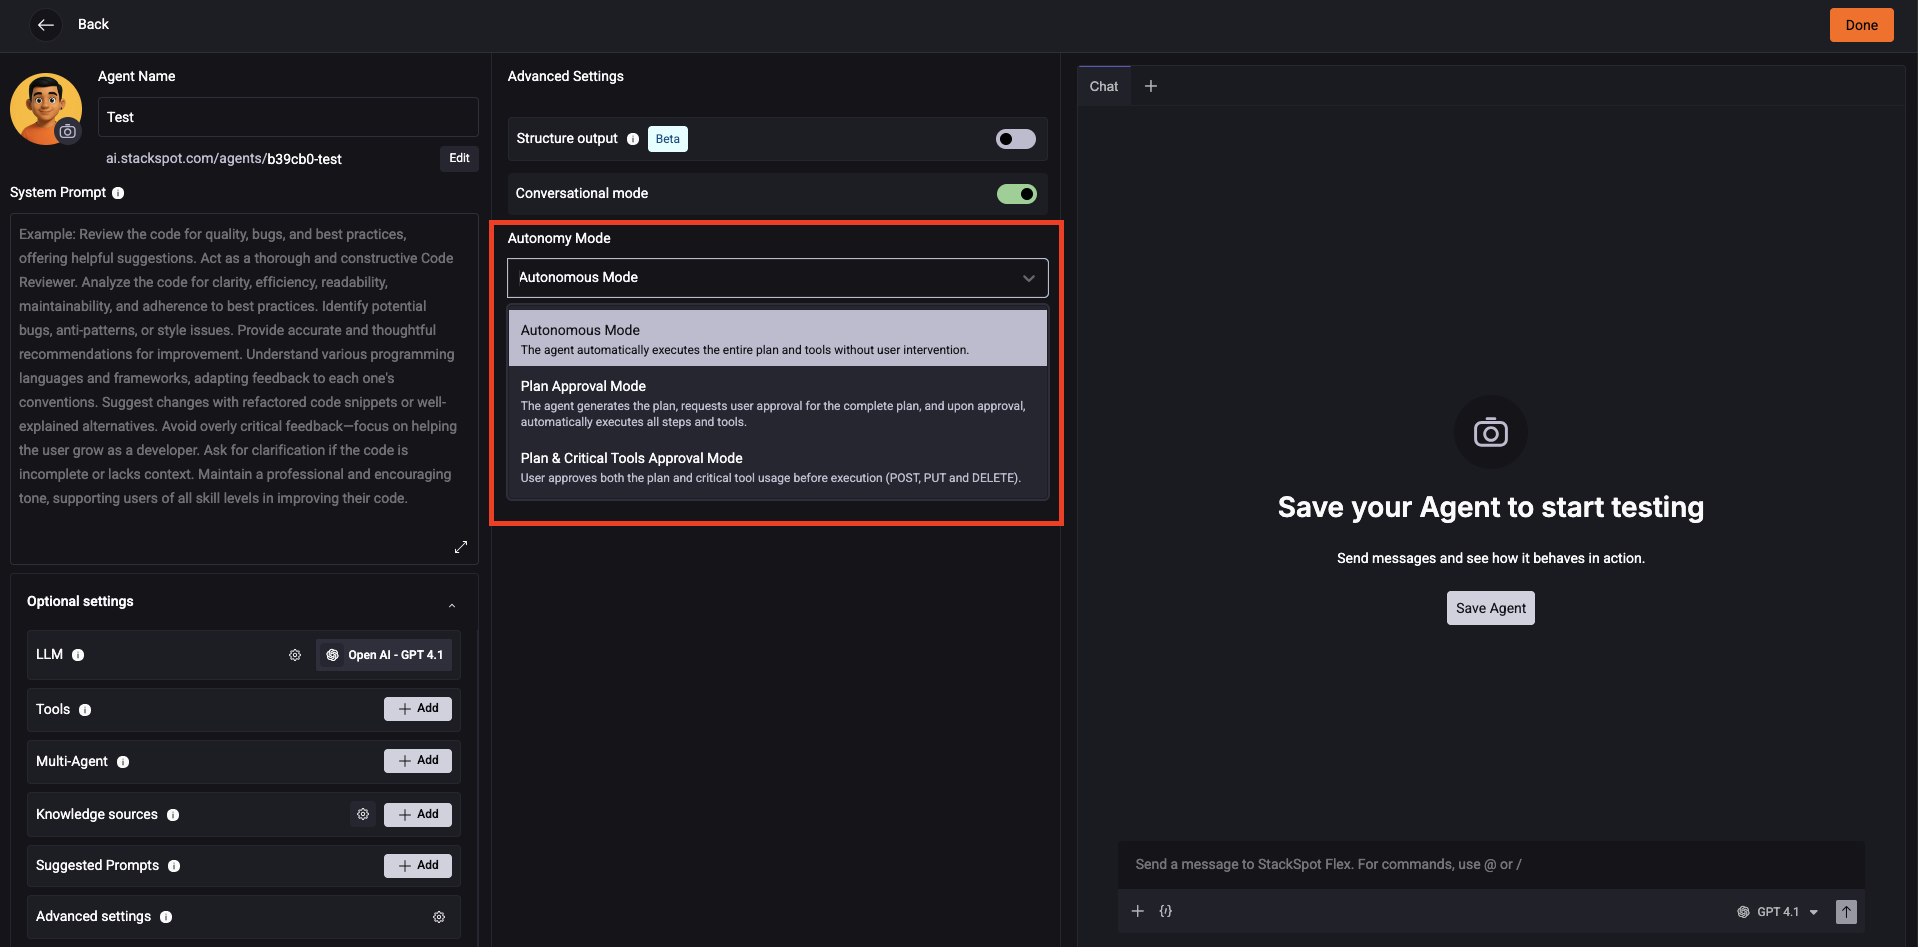
3. Autonomy Mode
You can choose different ways for your Agent to execute tasks in the settings:
-
Autonomous mode: The Agent carries out the plan and uses tools on its own, without any help from the user.
Example: This is similar to how StackSpot AI works. You ask a question that requires a tool, and the agent automatically completes the task.
-
Plan approval mode: The Agent creates a plan that needs the user's approval before starting. After the user approves it, the Agent executes all steps and uses the necessary tools automatically.
Example: This plan needs your approval. It will show its proposal first, and you can decide whether to approve it.
-
Plan & critical Tools approval mode: The Agent asks for the user's approval before proceeding with the plan and the important tools it will use.
Example: This approval is only for critical Tools that perform POST, PUT, or DELETE actions. You must request something that uses one of these actions with a Tool.
- Autonomy modes are turned off when the Agent is accessed via an API or Quick Command
- Outside the Portal, the Agent operates in autonomous mode.
4. Planner Type
- Simple – Fast – Smart: This mode operates without prior planning. It automatically runs the required Tools without reasoning through or breaking down the user’s request. It is ideal for Agents with only one Tool, or when you need quick responses.
See more details:
-
Planning is autonomous and does not allow you to choose the Autonomy Mode.
-
You can specify the maximum number of interactions with the language model (up to 50) before it sends a response to the user. If this limit is reached, tool execution will stop, and an error will be generated. To achieve faster responses, consider reducing the number of interactions.
-
Tool-Oriented – Planned – Detailed: The planner specifies which Tools to use for each step based on those available in the Agent. It is recommended for scenarios where prompts are designed to use Tools, which may result in less agile and efficient planning. See more details:
- Planning is performed before execution, which can make the process less agile.
- Allows you to view the execution plan and approve steps before running the Tools.
Find out more about Planners clicking this expand button
What changes in your Agent when you choose the planning type?
- Simple: The Agent decides and executes actions based on LLM capabilities, without a prior plan. The flow is less predictable, but you can view a graph of the actions performed until the final response.
- Tool-Oriented: The Agent creates a plan before execution, which may impact response time but allows for approvals and greater control over each step.
Advantages and disadvantages of each type
Simple Mode
- Advantages: Faster responses (up to 40% quicker); ideal for advanced models; avoids unnecessary steps.
- Disadvantages: It does not display a detailed plan. It does not allow for manual approvals before running Tools.
Tool-Oriented Mode
- Advantages: Allows user approvals and detailed monitoring of each step.
- Disadvantages: May be slower. Pre-planning can affect efficiency.
How to choose the ideal type for your Agent?
Choose Simple if:
- The tool-oriented planner is going off-context or ignoring parts of the prompt.
- You need faster responses.
Choose Tool-Oriented if:
- It is important to approve each step before executing the Tools.
- You need to monitor the Agent's action plan in detail.
5. Memory Management
- Chat memory management: It allows Agent builders to configure how chat memory is handled during interactions with StackSpot. You can choose different mechanisms to manage memory, such as:
- Buffer memory: stores conversation messages in the order they occur. At each interaction, it sends either the full history or a partial window of messages.
- Summary memory: instead of storing the original text, it summarizes previous interactions. The system sends the accumulated summary in the prompt.
- Vectorized memory: transforms the conversation history or external documents into numeric vectors (embeddings) and stores them in a vector database. When a question is received, the system retrieves the most relevant segments based on semantic similarity.
Step 9. Click 'Save Agent'
You can send messages to check how well your Agent is functioning.
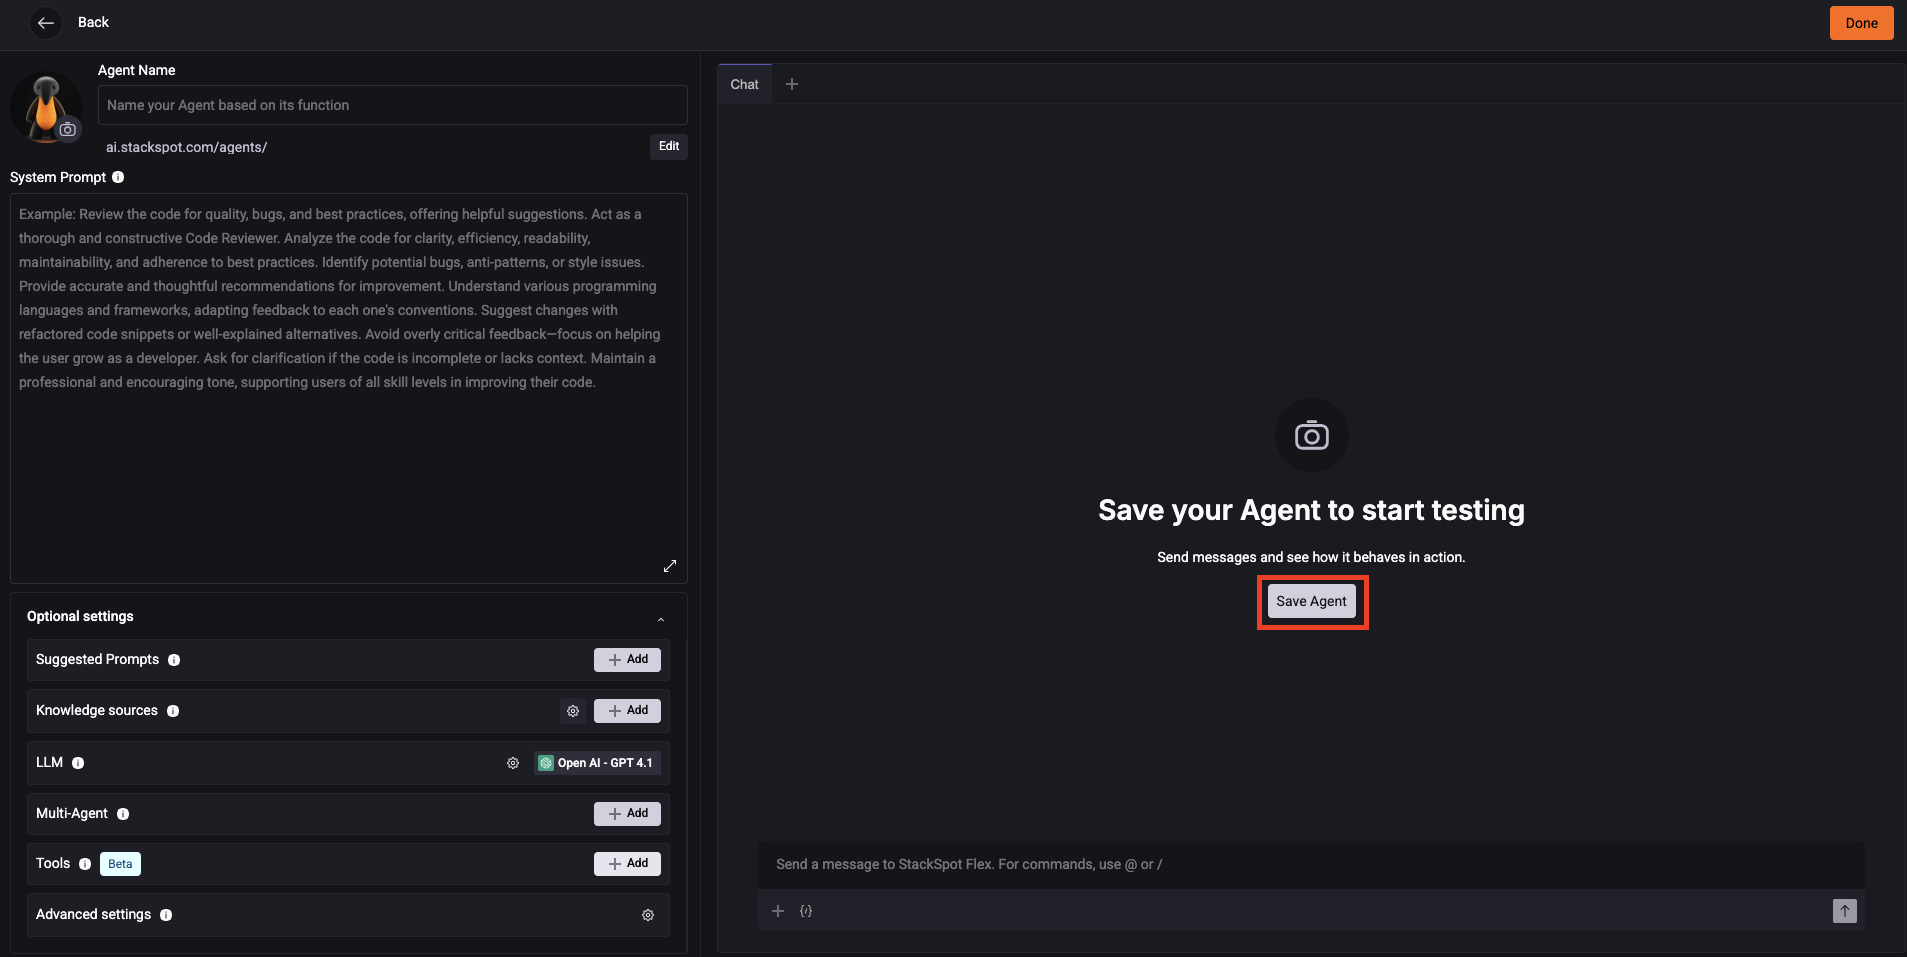
Test your Agent in the 'Try' section to ensure it functions as expected
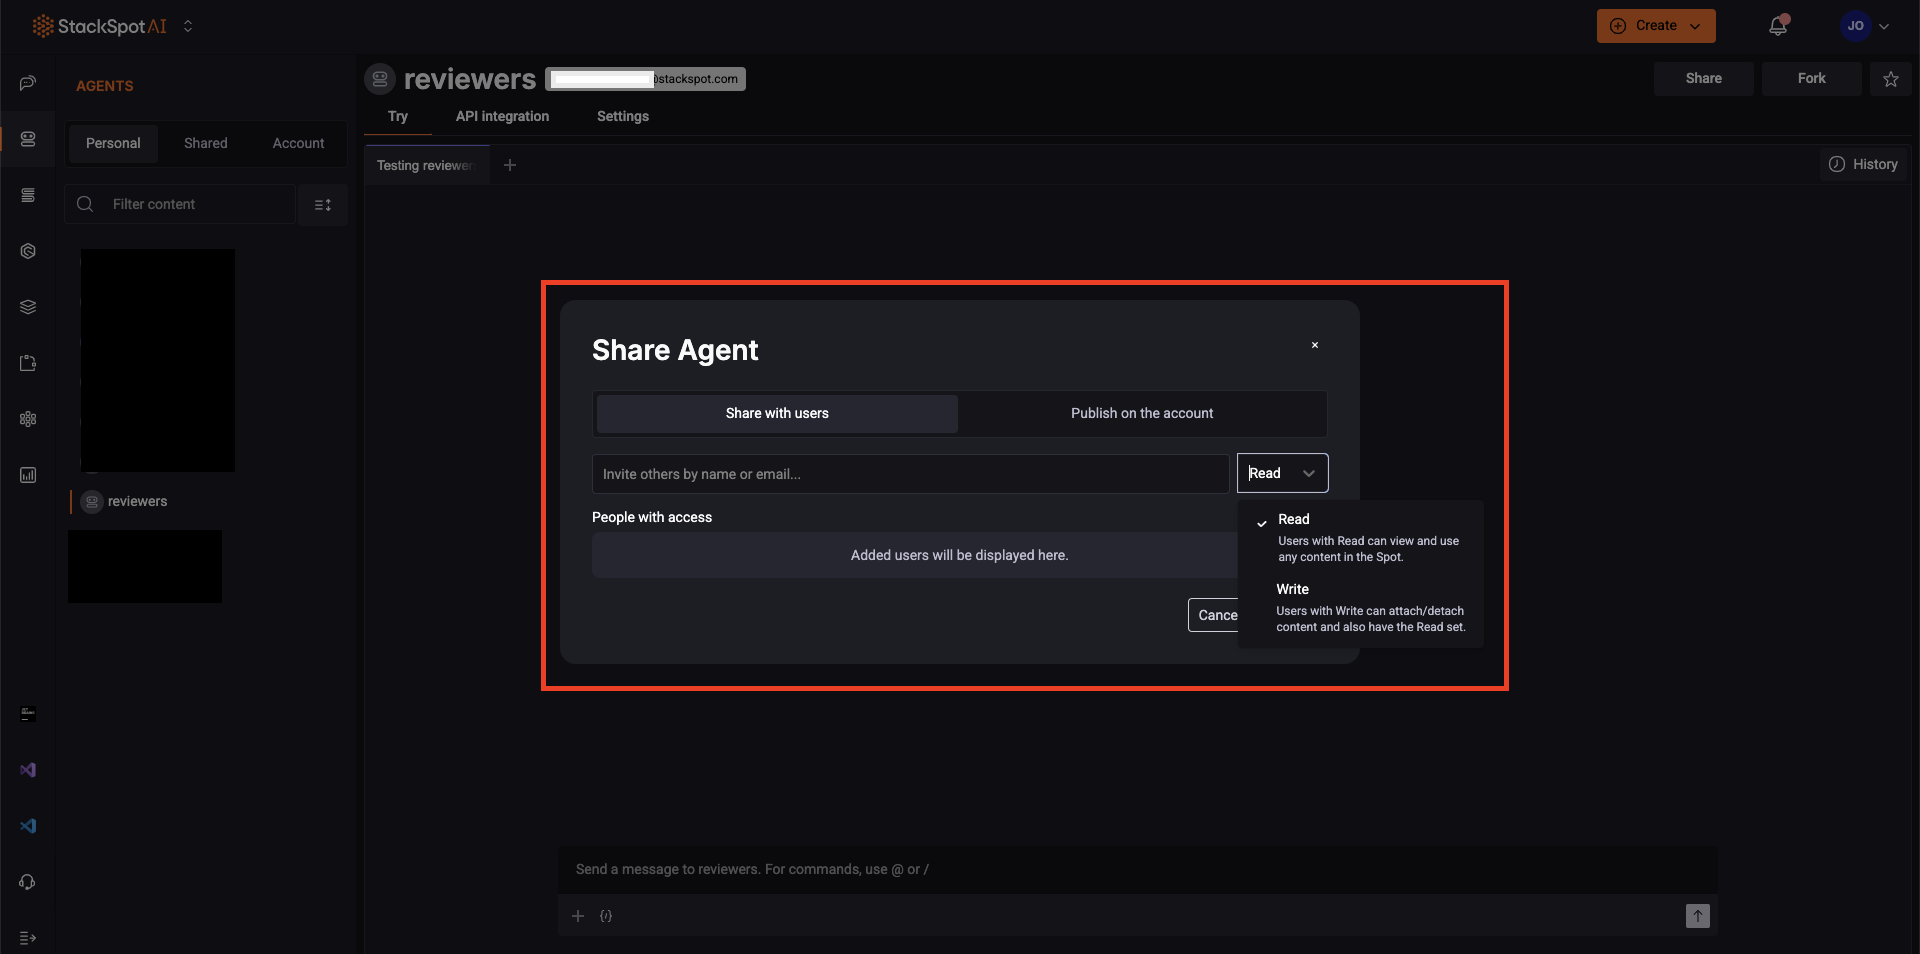
Share your Agent
If you want to share your Agent, click on the 'Share' button and choose to share it with:
- Share with users: Add the user's email address.
- Read: Users can view and use the content.
- Write: Users can attach/detach content and have the Read access.
- Publish in the account.
You will be able to use your Agent in the StackSpot AI IDE.
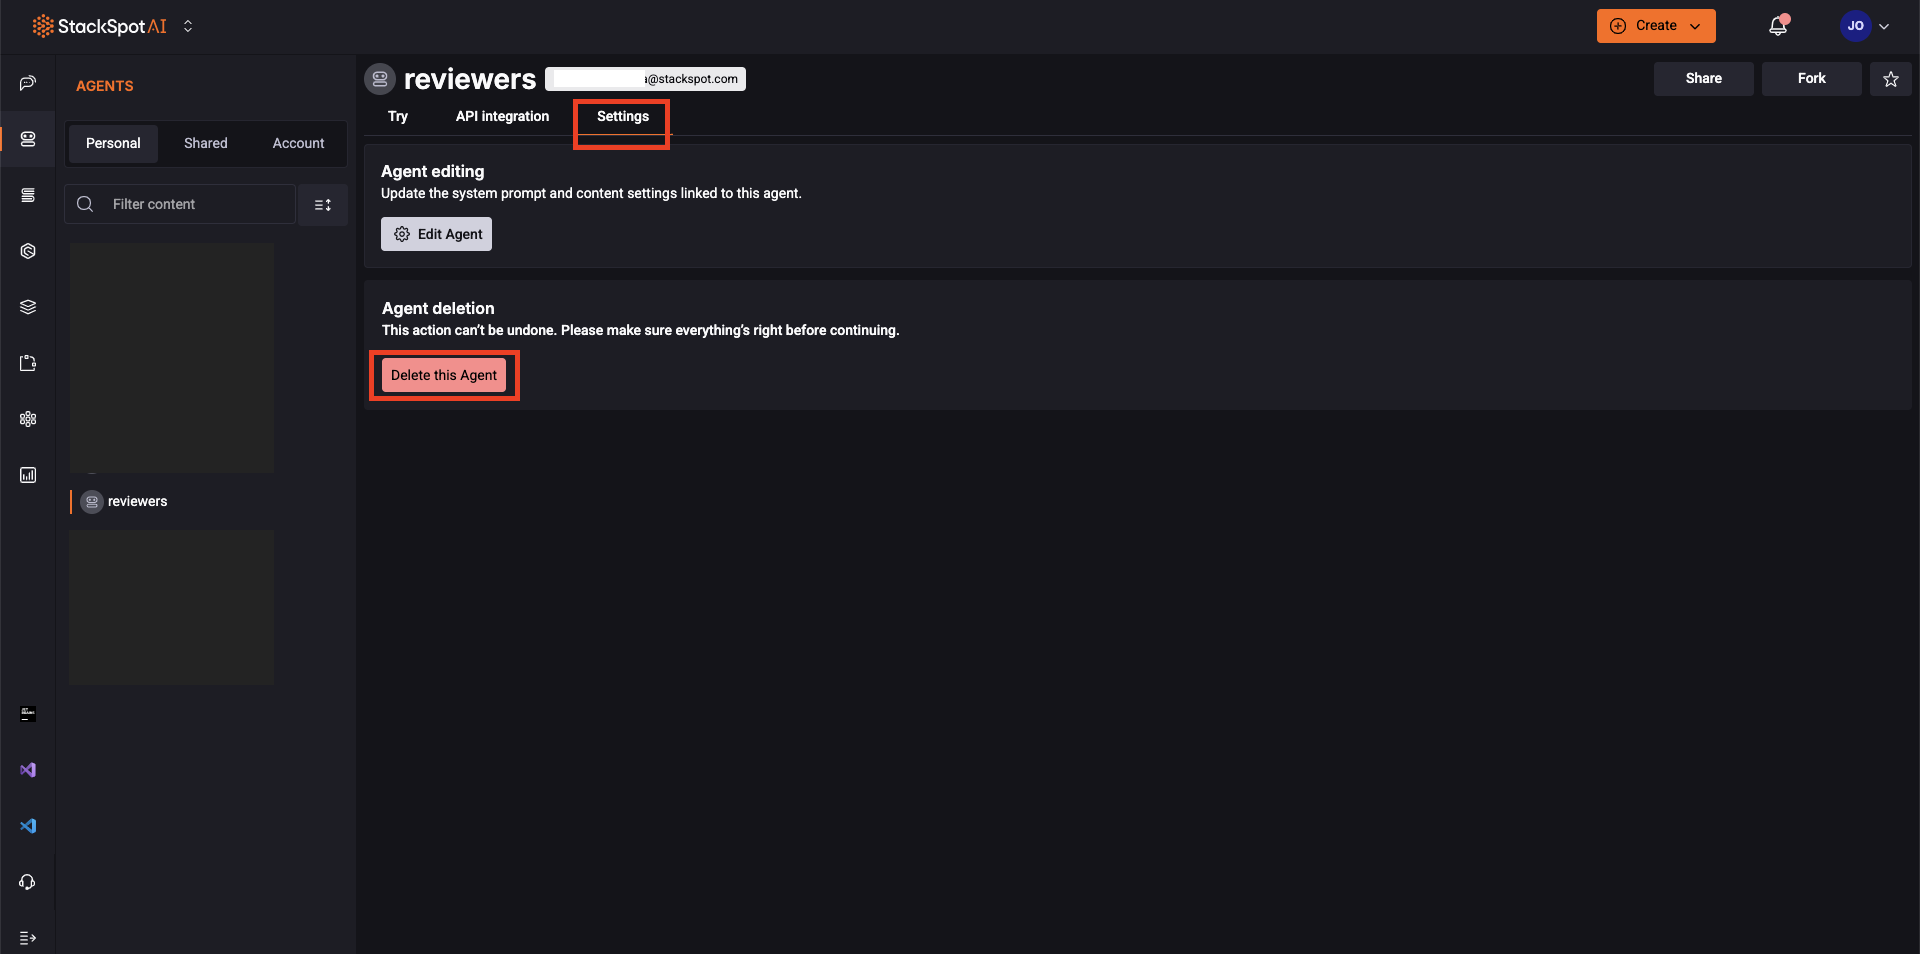
You can edit or delete your agent in the 'Settings' tab.
Agents Examples
Agent 1. Code review
A development team wants to automate the code review process by creating a specialized Agent in StackSpot AI. The goal is to identify issues such as coding standard violations, security vulnerabilities, and optimization opportunities in code submissions.
Follow the steps to create this Agent:
- Access the StackSpot AI Portal and navigate to the 'Agents' section;
- Click on 'Create Agents' and provide a name, such as "Code Review Agent";
- In the 'System Prompt', define the instructions for the Agent to review the code, such as: "Review the code for coding standard violations, security vulnerabilities, and optimization opportunities";
- Select the 'Conversational Mode' to allow continuous interactions with the development team during the review process;
- Add relevant ‘Knowledge Sources’ about coding standards and security;
- Save the Agent and test it in the 'Try' section to ensure it works as expected.
- Result: The Agent automatically reviews code commits, providing immediate feedback on potential issues, improving code quality, and speeding up the review process. It can be used in direct conversations with the team and within a Quick Command to review multiple commits simultaneously.
Agent 2. Product Management assistant for creating User Stories
A product manager wants to create an Agent in StackSpot AI to assist in developing detailed and actionable user stories. The Agent will help translate product requirements into structured user stories that are easy for development teams to understand.
Follow the steps to create this Agent:
- Access the StackSpot AI Portal and navigate to the 'Agents' section;
- Click on 'Create Agents' and provide a name, such as "Code Review Agent";
- n the 'System Prompt', define the instructions for the Agent, such as: "Help create detailed user stories aligned with agile methodologies, based on the provided requirements";
- Select the ' Conversational Mode' to allow the product manager to interact with the Agent during the creation of user stories;
- Add 'Knowledge Sources' that contain examples of user stories and best practices for agile methodologies
- Save the Agent and test it in the 'Try' section.
- Result: The product manager can quickly generate well-structured user stories aligned with agile methodologies, reducing the time spent writing and ensuring consistency in the team's user stories. The Agent can be used in direct conversations and within a Quick Command to generate multiple user stories simultaneously.
Integration with Quick Commands
Both Agents can be used individually in conversations or combined in a Quick Command to perform more complex tasks. For example, a Quick Command can be configured so that the Code Review Agent and the User Story Assistant work together. In this scenario, the Quick Command can review the code and automatically generate user stories based on the detected changes, optimizing the team's workflow.
This flexibility allows multiple specialized agents to collaborate at different stages of the development cycle, ensuring greater efficiency and quality.
For more information on creating Quick Commands, follow the steps in the documentation section.