Create Quick Command: IDE
Create a Quick Command
Follow the steps below to create:
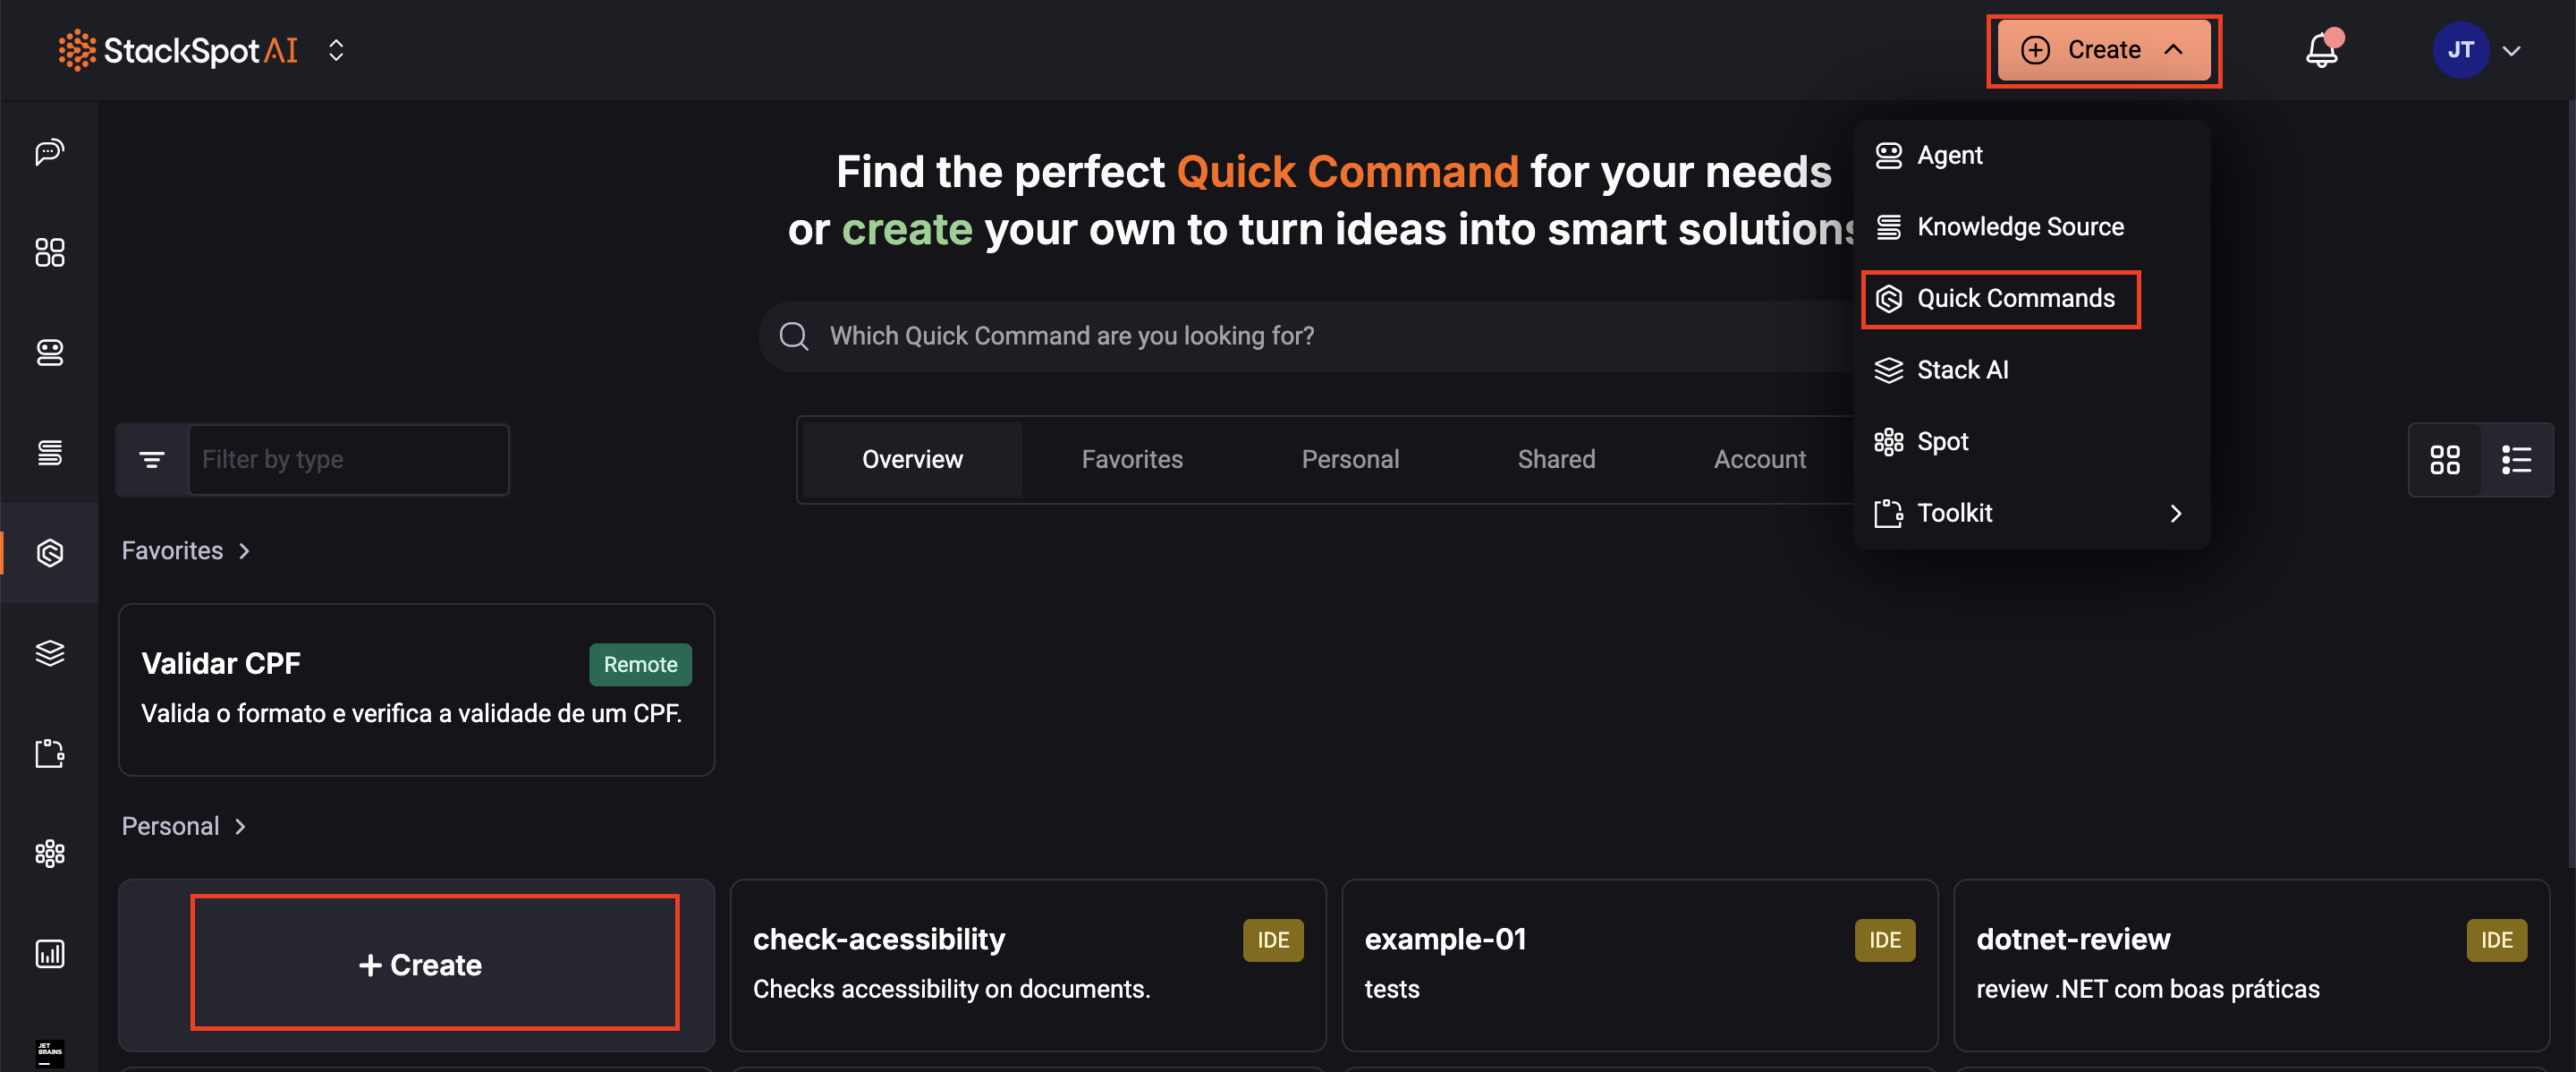
Step 1. Access the StackSpot AI Portal
Step 2. On the menu, click ‘Quick Command’
Step 3. Click on the ‘Create Quick Commands IDE’ button;
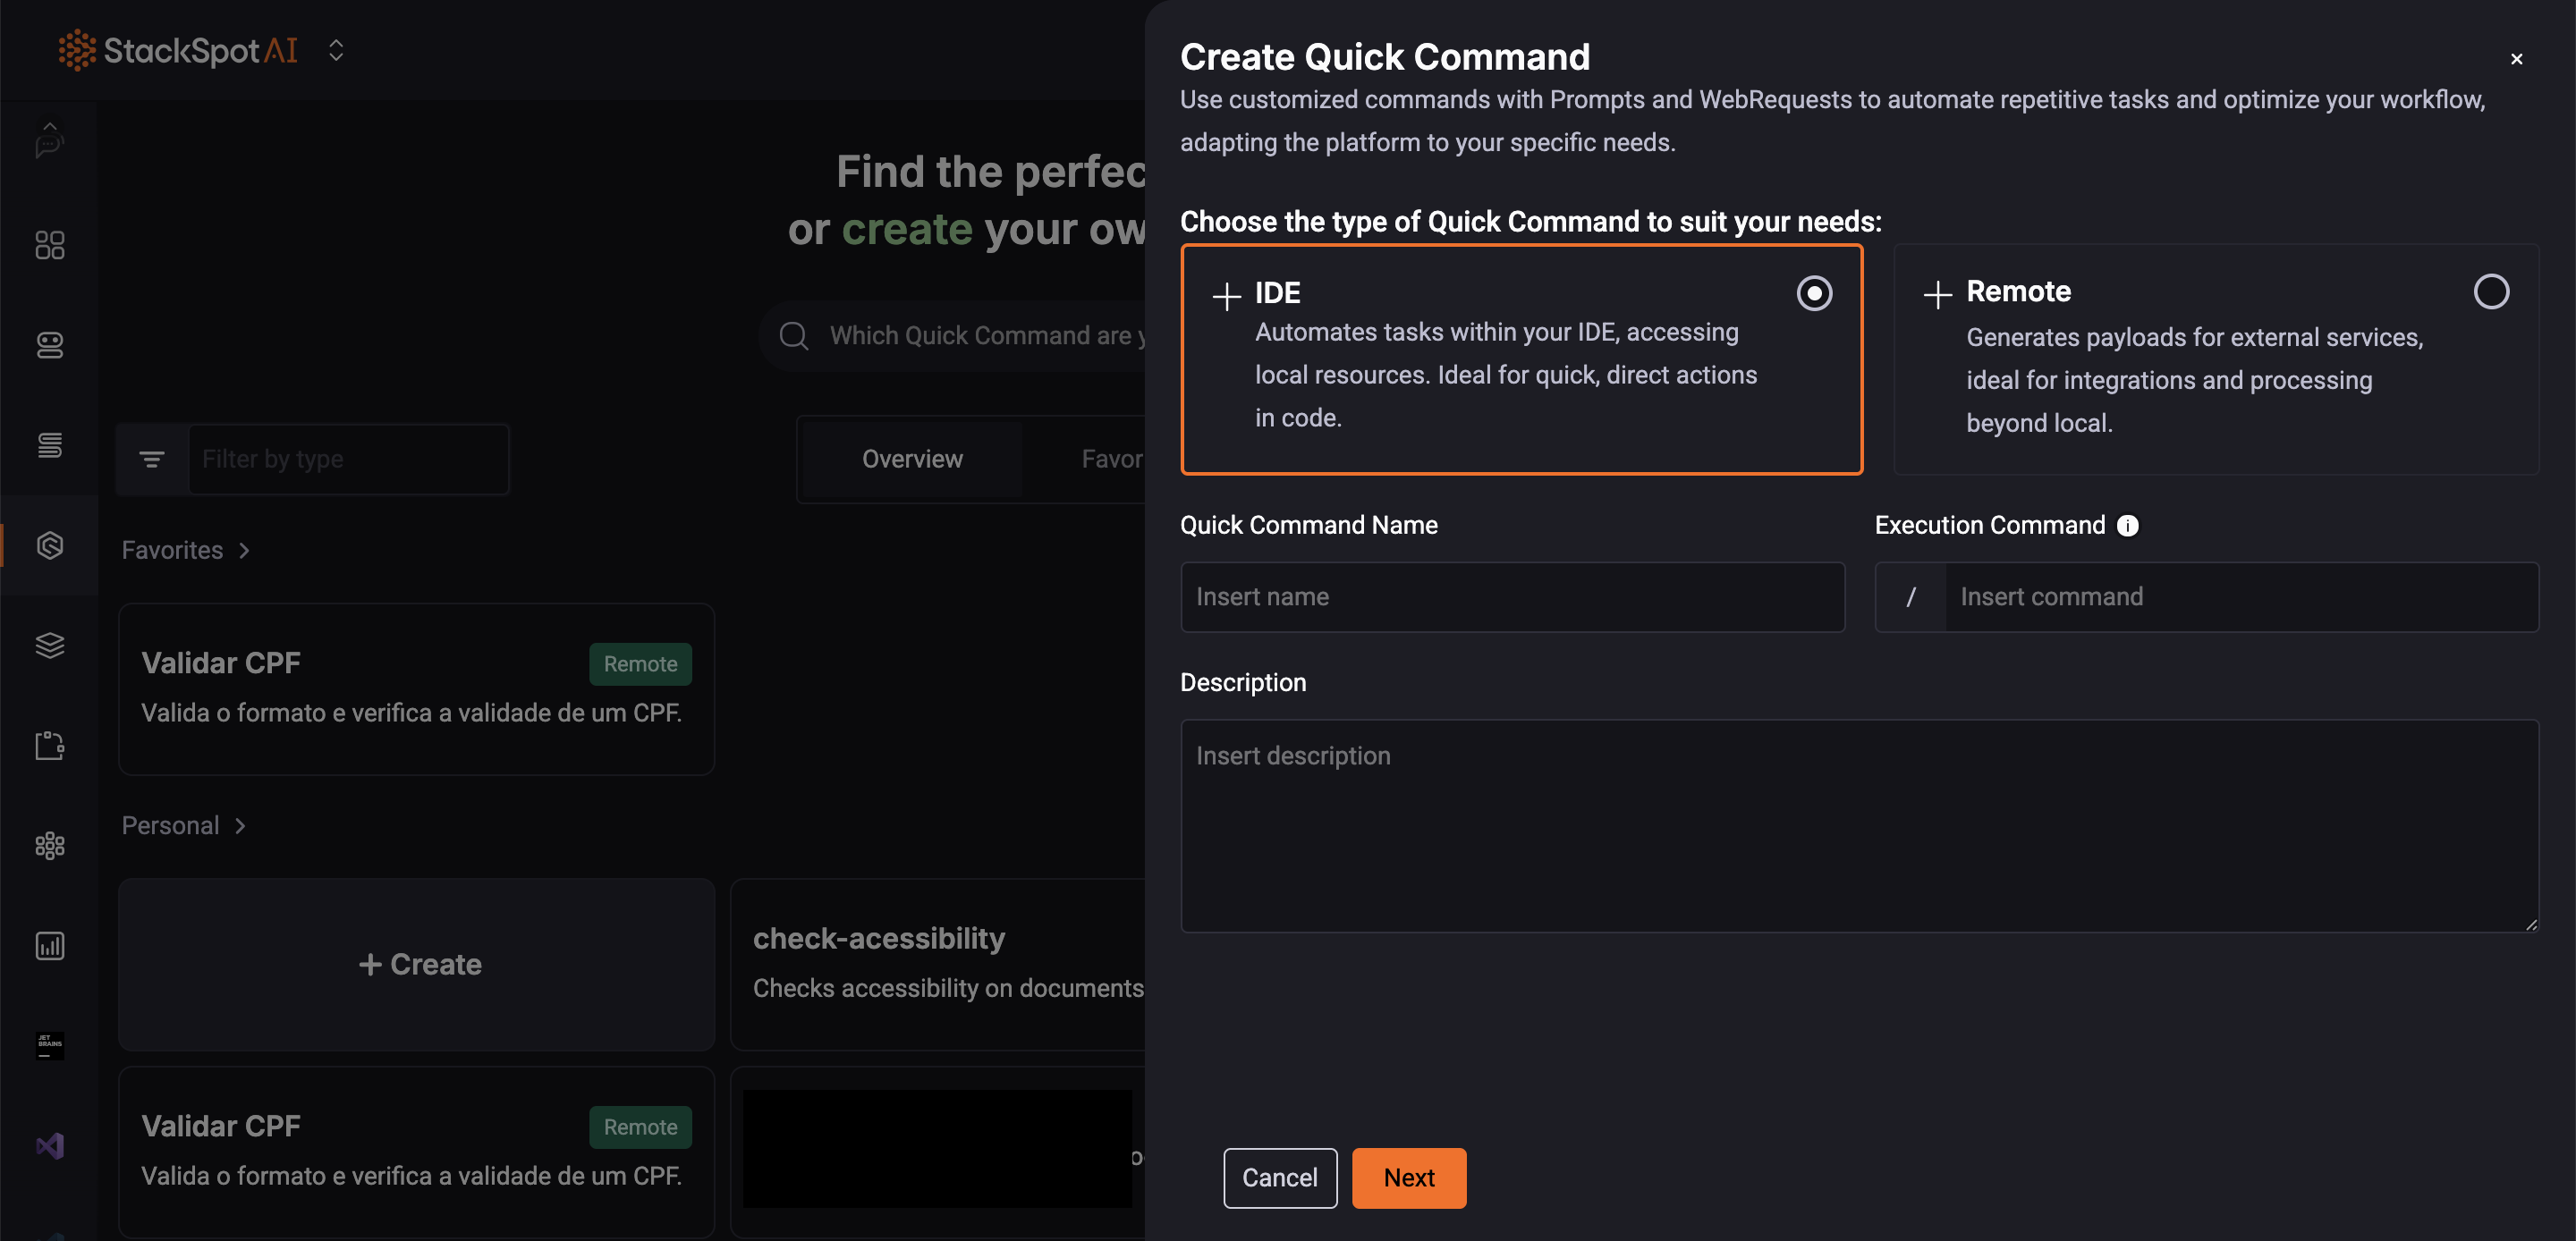
Step 4. Select the IDE option;
Step 5. Fill out the fields to add information about your Quick Command.
See an example below:
-
Quick Command Name: Add a name for your Command. Example: Technical Debt
-
Command: Add a name you will use it later; it should follow the slug pattern. For more information about Slugs, see the slug pattern. Example: technical_debt_1
-
Description: Add a description of what your Command can do. Example: Create an issue on GitHub highlighting technical debt on the selected code and suggest a corrective action.
Step 6. Click the 'Next' button. You can use the available templates (which are already pre-filled) or create one from scratch, according to your preferences.
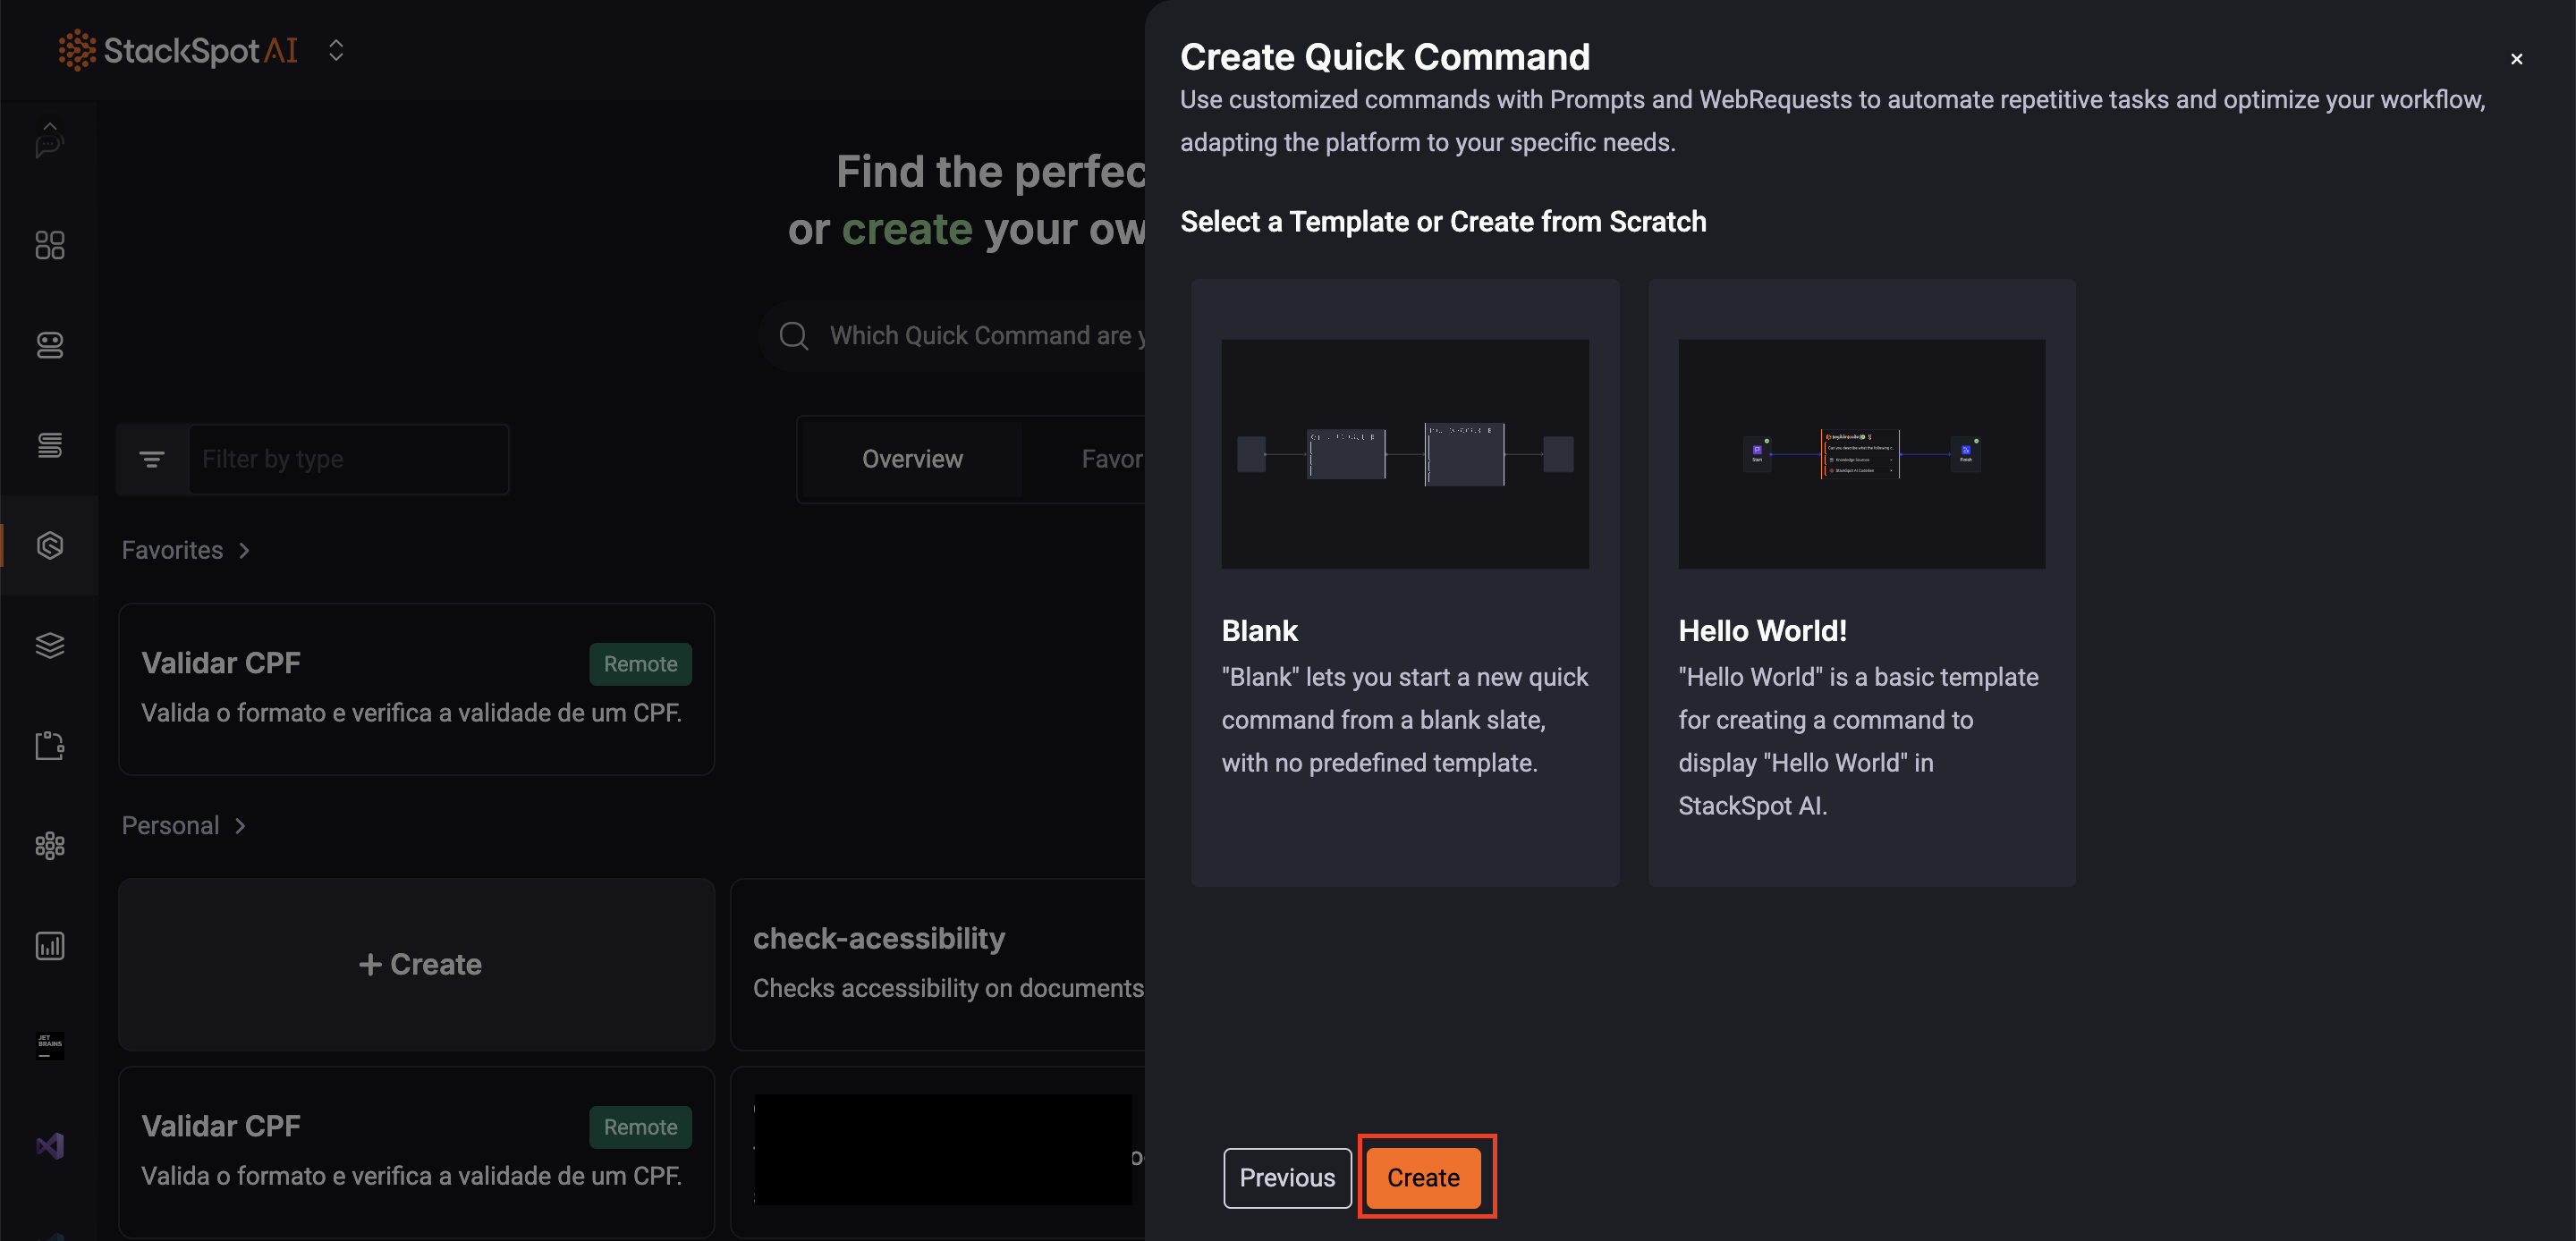
See the example:
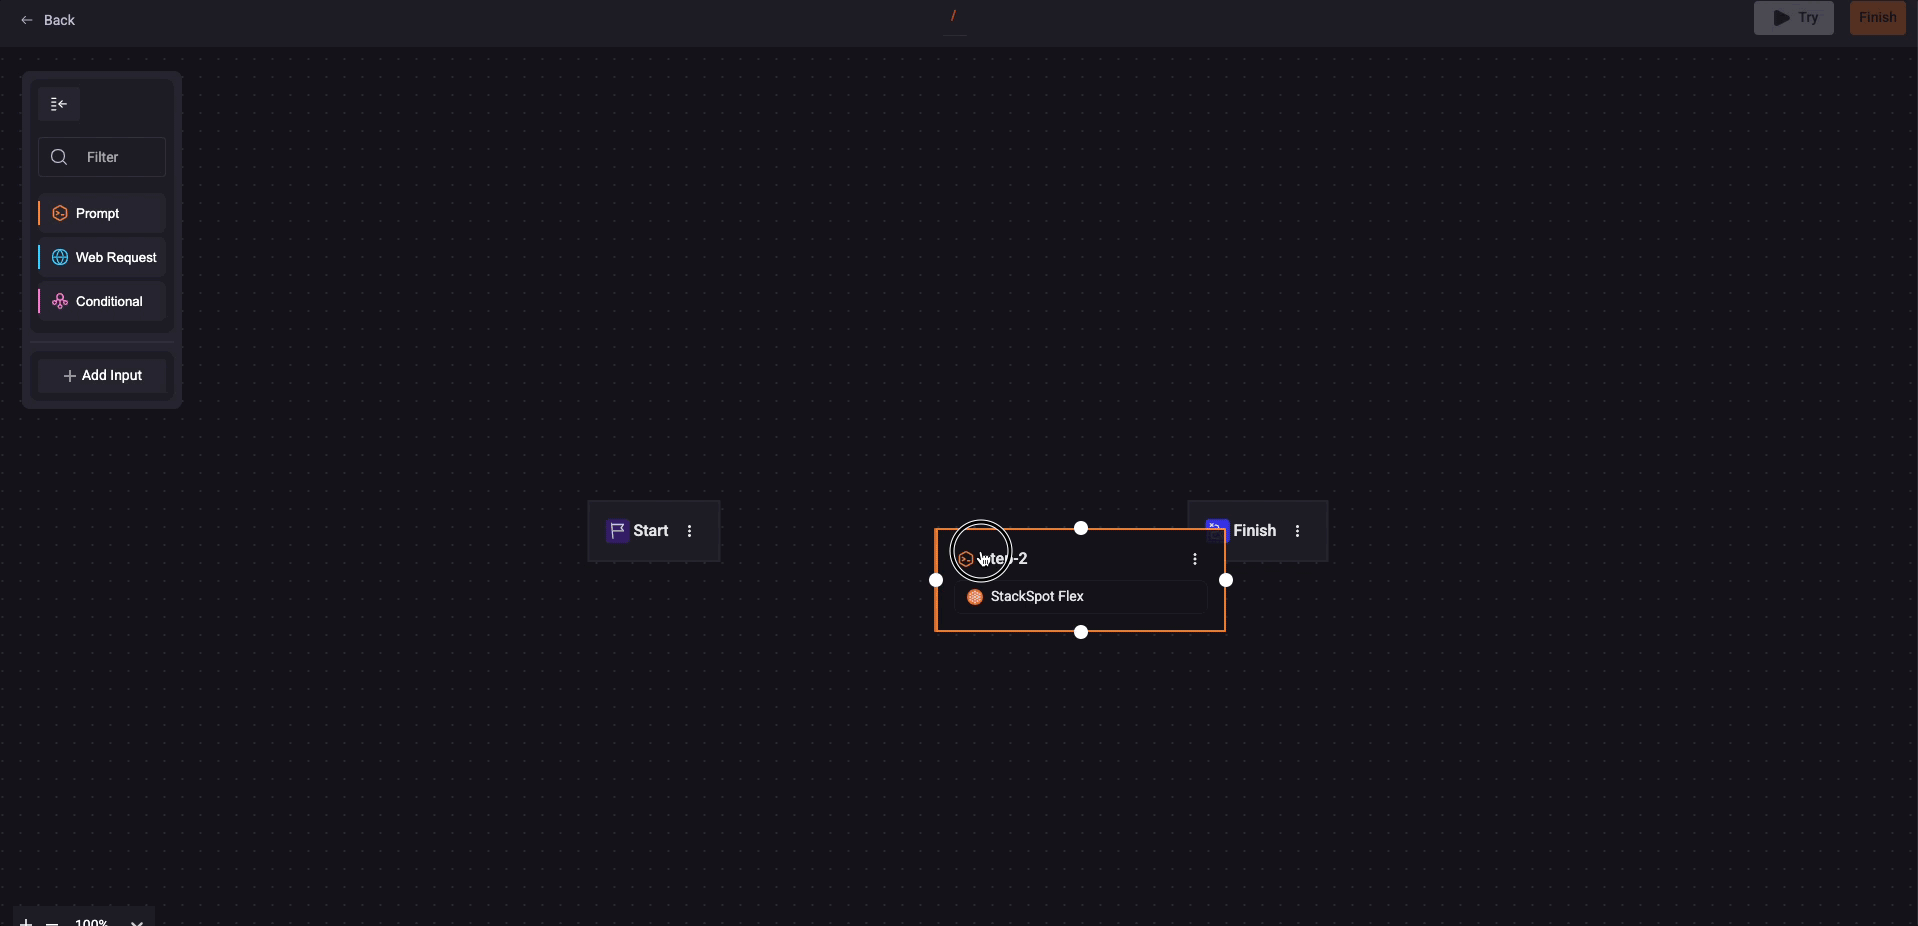
Follow the workflow on the screen. Click on 'add button'. Choose ‘Prompt’
Use a 'Prompt' Step
See below an example creating a 'Prompt' step in your Quick Command:
1. Click 'Create blank'. Then drag and drop the 'Prompt' box to the 'Start'. You must connect the boxes with the blue line;
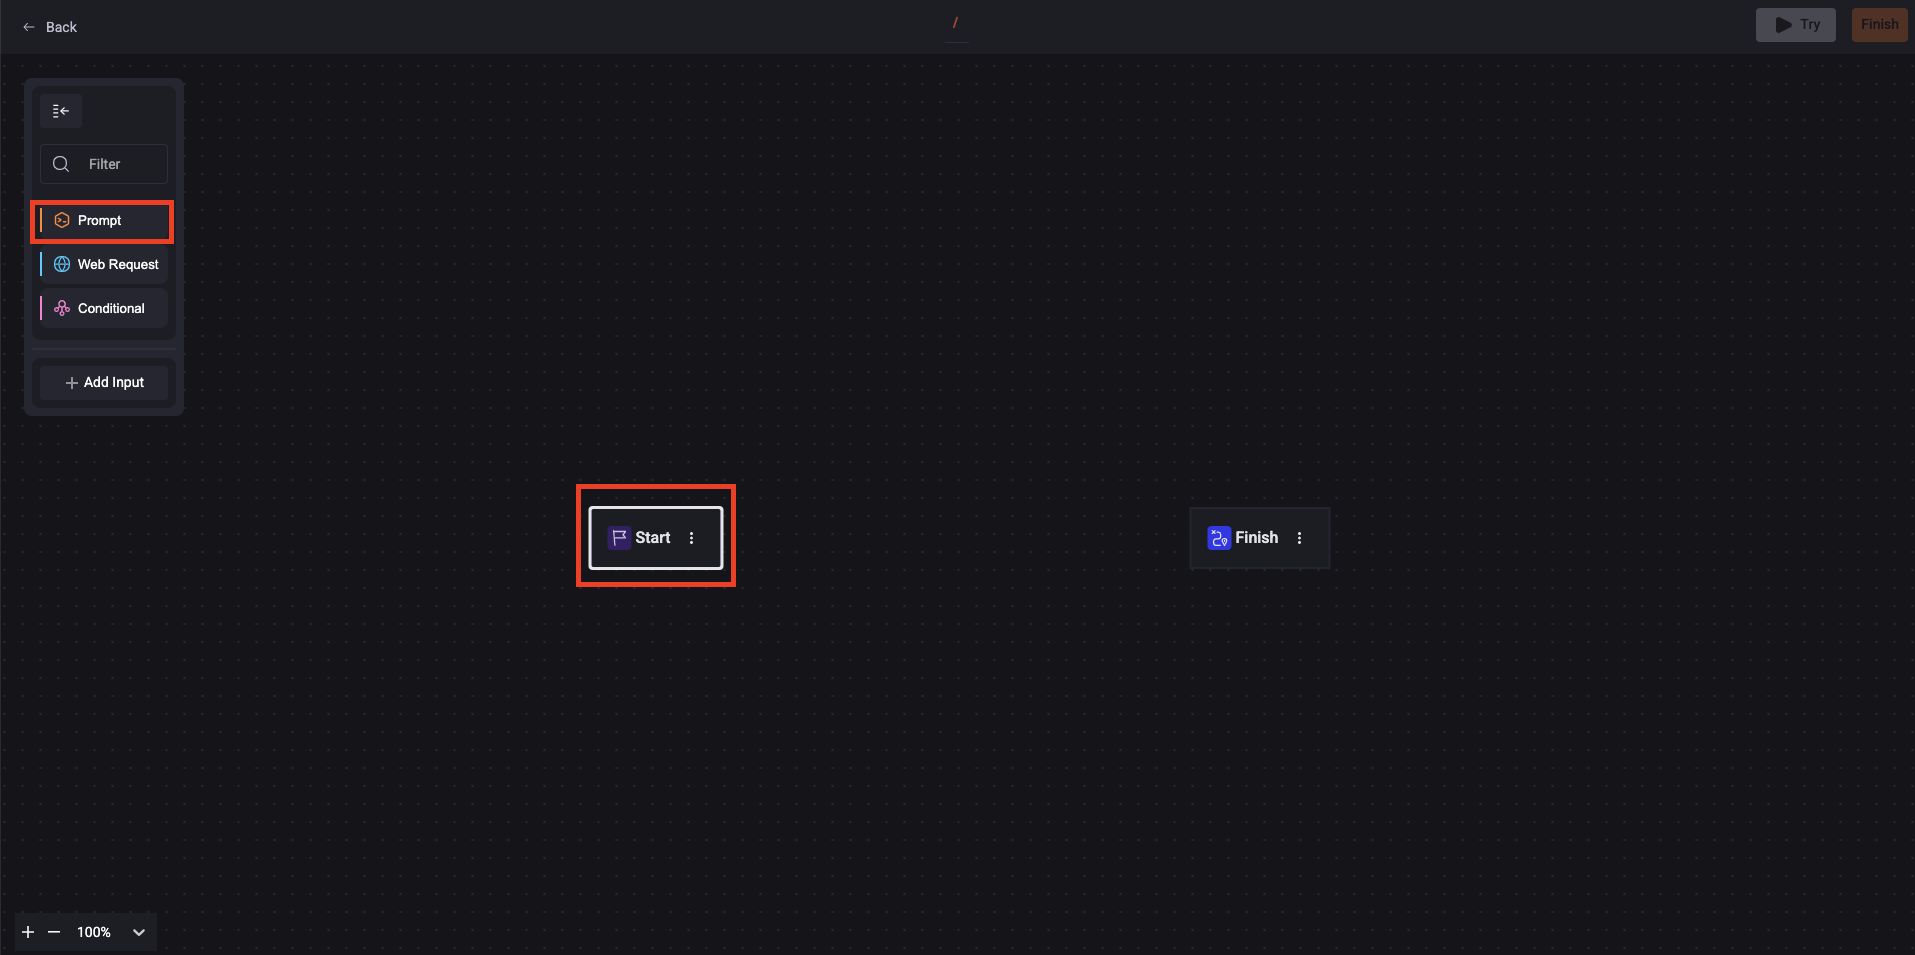
2. Fill out the fields on the prompt box:
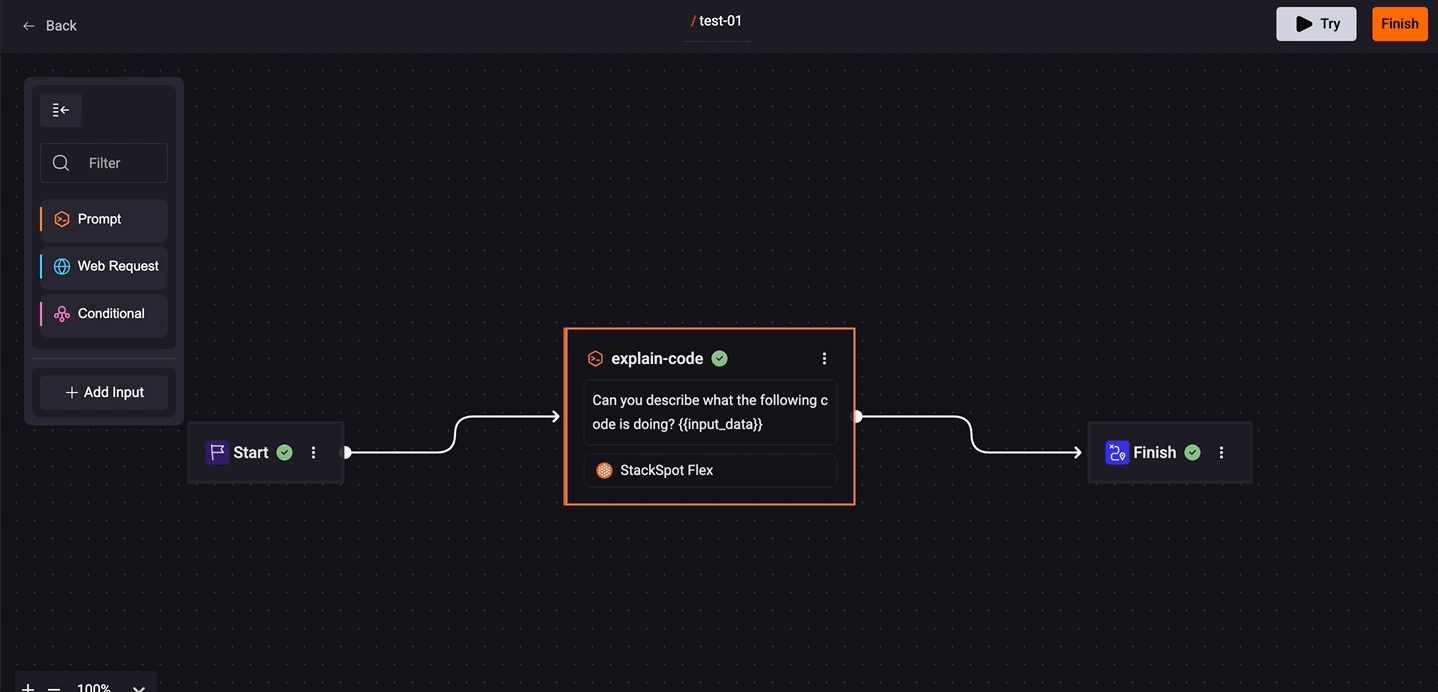
- Prompt name: Add a slug identifier following the slug pattern. See an example:
/issue-title
- Insert your prompt: Write down what you want your command to do.
If you want the user to select a specific code extract, insert the {{ input_data }} in the designated place. Adding this option sends the information to StackSpot AI and make it easier to understand.
See the example: "Read this {{ input_data }} and write a title of up to 80 characters for a GitHub issue."
You can incorporate conditionals steps into your Quick Commands workflow. For more details, access the Conditional page.
-
Use the current Stack to generate code: This option depends on your needs.
- When enabled, it considers the context of your Stack and generates code based on whether you have a Java or Python Stack, for example. If you require code generation, then this option is recommended.
- However, if you need to generate text, like translations, it's best to refrain from enabling this option as it may not yield optimal results.
-
Use Indexed Project: Activate the indexed project at this step to utilize indexed files and enhance the context in the Quick Command. After a project is indexed, the Quick Commands feature uses this data to create more accurate and relevant commands and workflows. This should result in suggestions customized for the specific environment of the indexed project.
-
Use selected Knowledge Source in the chat: When you enable this option, StackSpot AI will include all the Knowledge Sources the user selects in the IDE during a Quick Command execution (including those within the selected Workspace) and those already configured in the Quick Command. This will enhance the Quick Commands with essential, Workspace-specific information, boosting their utility and context awareness.
-
Include the uploaded files: To allow the users to upload files in the specific step of the Quick Command, activate the Include Uploaded Files in each step you want. When this toggle is enabled, users can upload files during command execution.

- When the command is executed with this toggle enabled, the user must upload the file at the start of the process.

- Continue on error: Allows you to define the next step based on the success or failure of a step. This way, you control the Quick Command flow as needed.
- To configure, click on the prompt box and check the 'Continue on error' option. Click on 'Success' and connect the desired box. Do the same for 'Error'.
- You can handle errors by displaying the status, error message, or other information using Jinja variables in the Final Result field. For more details, access the documentation.
- If a step does not have this option enabled, any error will stop the Quick Command execution.
- If the option is enabled and an error occurs, the flow will follow the path defined for Error. StackSpot AI will only continue execution if an error flow is defined.
This option is available only for Prompt steps, not for Web Request ones.
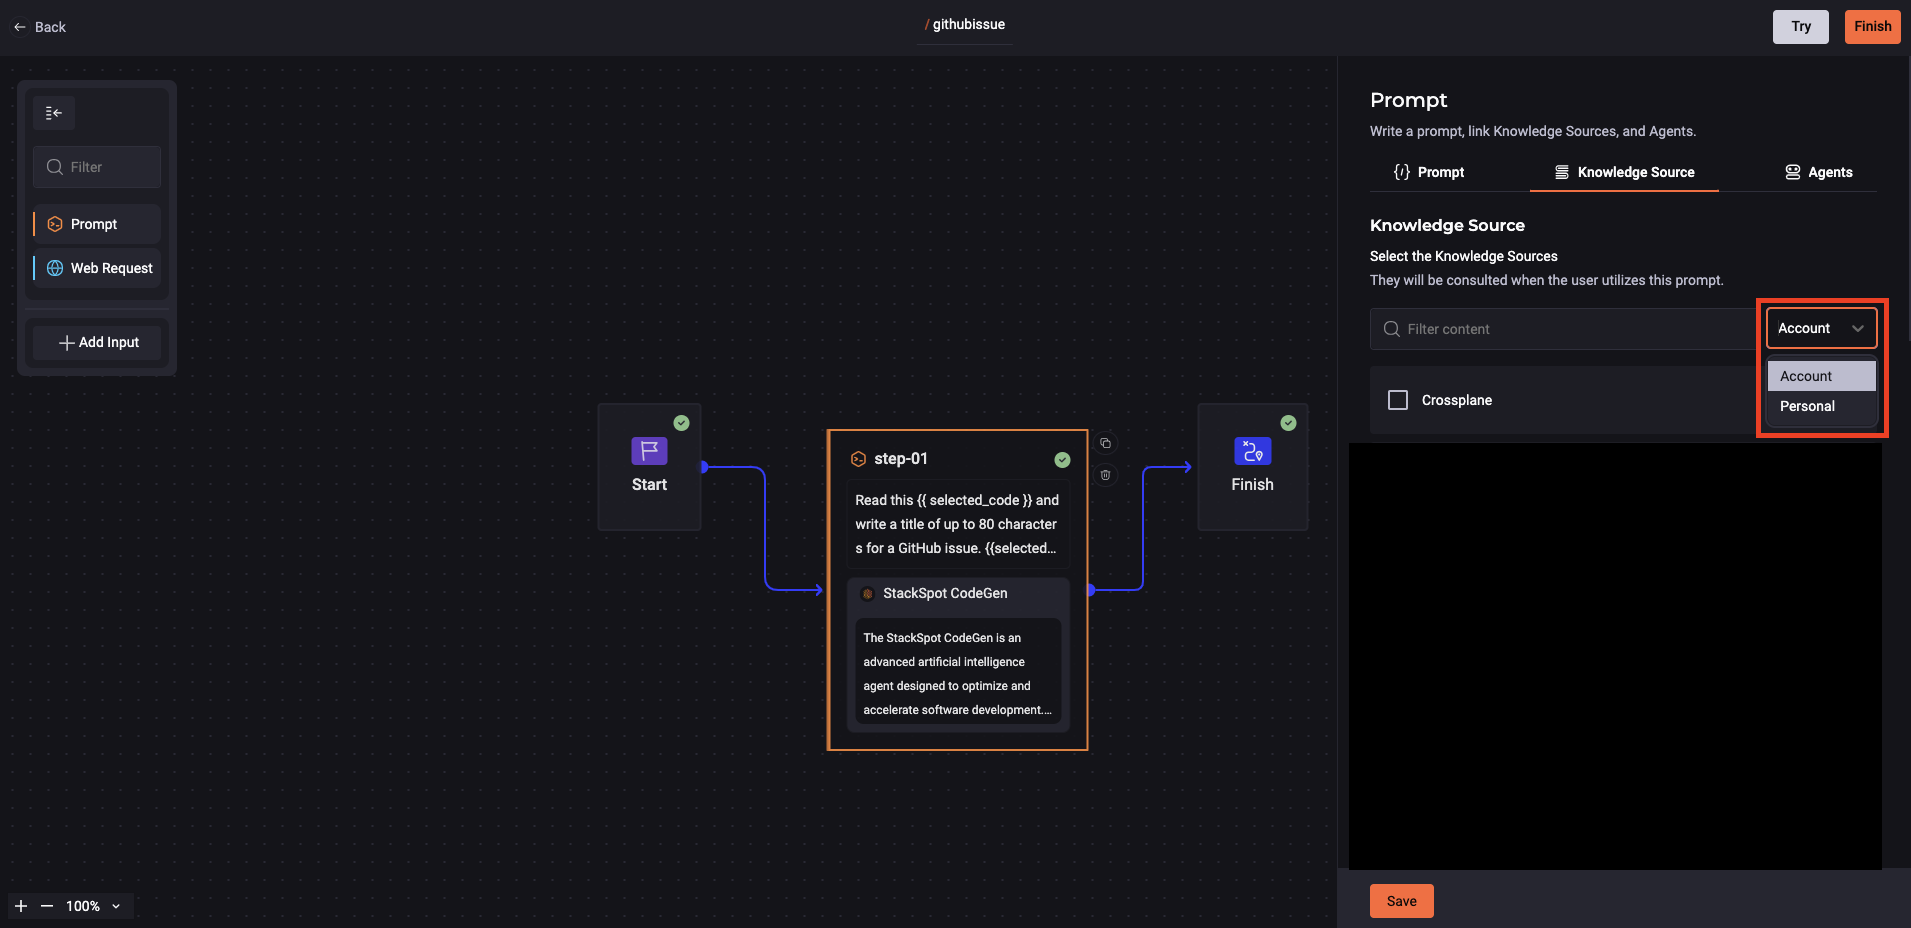
3. Select Knowledge Sources
This is not required. You should choose this option when creating a Quick Command and you want to select a specific context from a Knowledge Source. This option is useful when creating a command requiring detailed knowledge, such as searching for vulnerabilities based on security policies.
4. Select Agents
You can select agents when creating a Quick Command. These agents will be consulted whenever the user utilizes this prompt.

5. Click on the 'Save' button, then connect the line of your prompt box to the 'Finish' box.
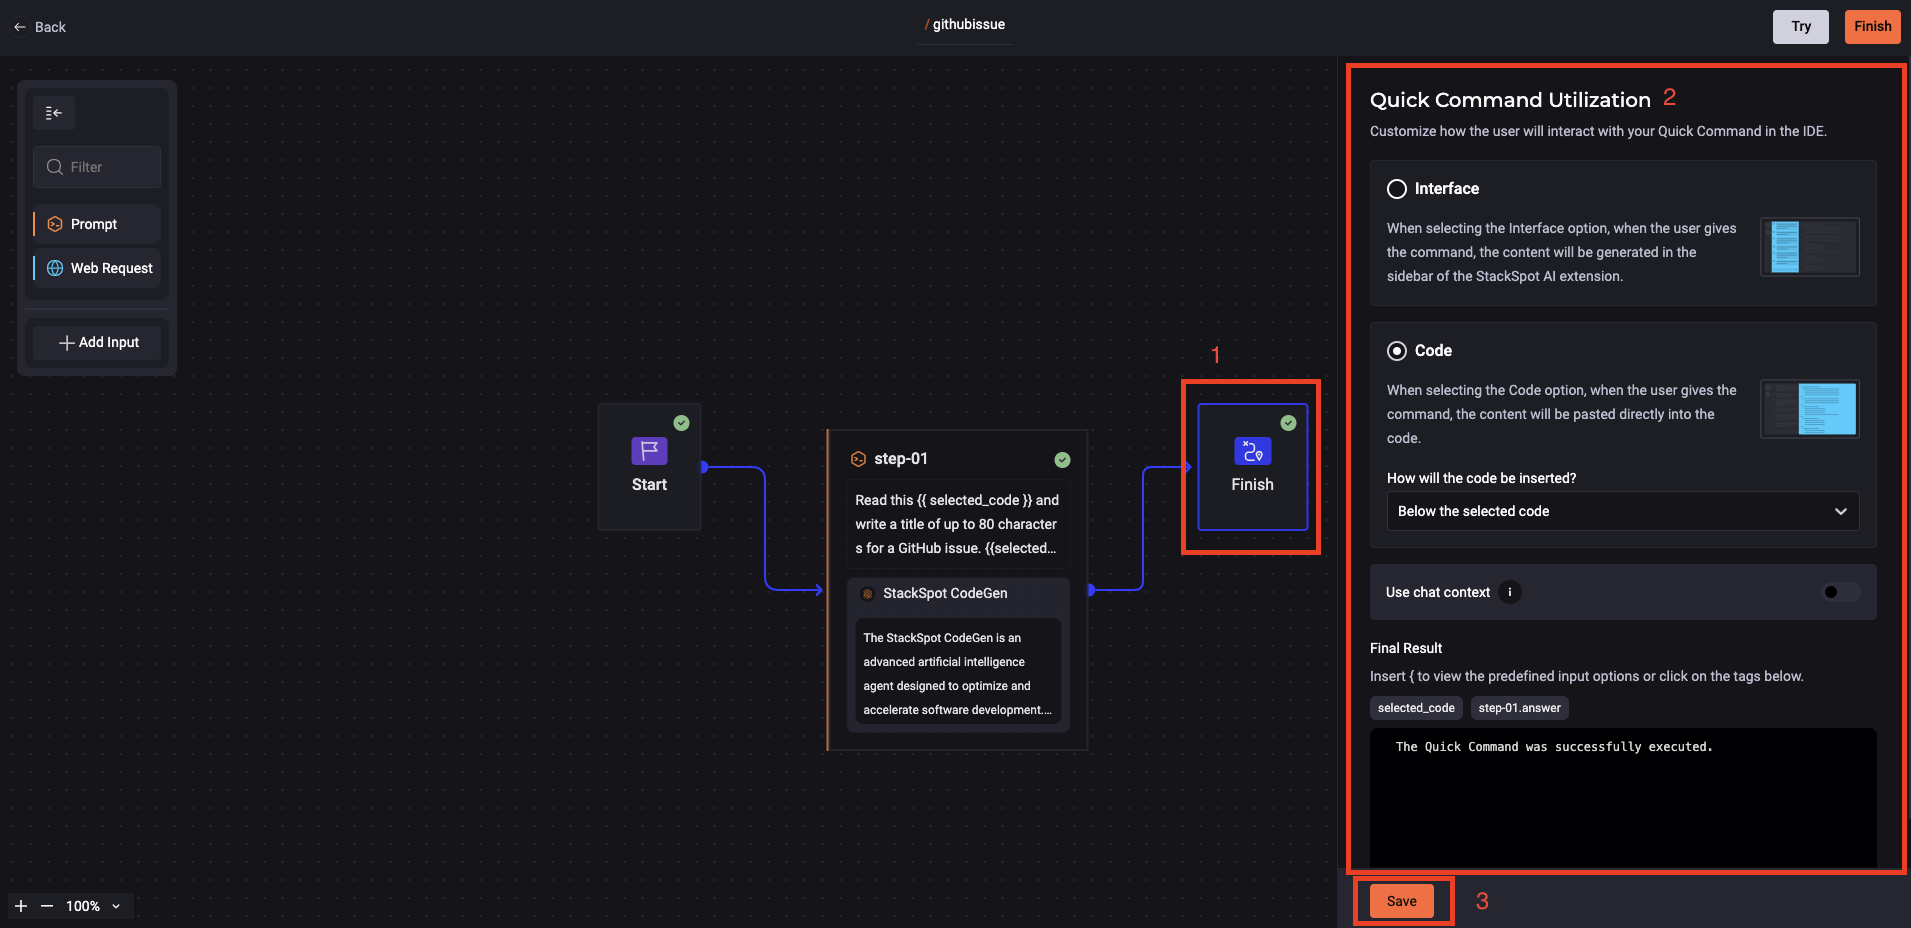
6. Click 'Finish' and fill out the *Quick Command Utilization screen:
- Choose the way the user can interact with your Quick Command in the IDE, see below:
-
Interface: The user gives the command, and the content shows in the sidebar of the StackSpot AI Extension.
-
Code: The user gives the command, the content will be pasted directly into the code or:
-
Above the selected code
-
Below the selected code
-
Replace the selected code
-
Insert .answer after the name of your Quick Command (only if it is a prompt option):
{{ title_issue.answer }}
7. Click on the 'Save' button.
The command can use the Jinja format.
See the example below:
Use a 'Web Request' Step
This example adds a 'Web Request' step to a Quick Command that already has a Prompt step to obtain a title for a GitHub issue.
Step 1. Click on ‘Web Request’, then click on the added Step card and fill in the fields:
- Web request name: github-issue
- HTTP Method: POST
- URL Endpoint: This is a GitHub API that uses your repository. Replace the values
{ONWER_REPO}/{REPO_NAME}with your username or organization and the name of the repository where you want to open the issue:https://api.github.com/repos/{ONWER_REPO}/{REPO_NAME}/issues - Headers:
For this type of request, you need to generate a fine-grained Personal Access Token (PAT) in your GitHub profile settings. Go to the ‘Developer settings’ section and grant the necessary permissions to interact with repositories. Then, create a Secret in StackSpot or select an existing Secret in your account to use in the 'Key' and 'Value' fields.
Assume a Secret was created with the name github, with the Key MY_TOKEN and Value set to your PAT. When you select the Secret, it will be added as:
- Key: MY_TOKEN
- Value:
{{secrets.user.github.MY_TOKEN}}(Secret format for Personal storage)
This way, your request header should contain Authorization with the 'Value' as the variable {{secrets.user.github.MY_TOKEN}}.
Fill in the request 'Headers' by completing the 'KEY' and 'VALUE' fields as shown in the example below:
Do not use quotes when filling in the Headers.
{
   "Accept": "application/vnd.github+json",
   "Authorization": "Bearer <ADD_YOUR_TOKEN>",
   "X-GitHub-Api-Version": "2022-11-28"
}
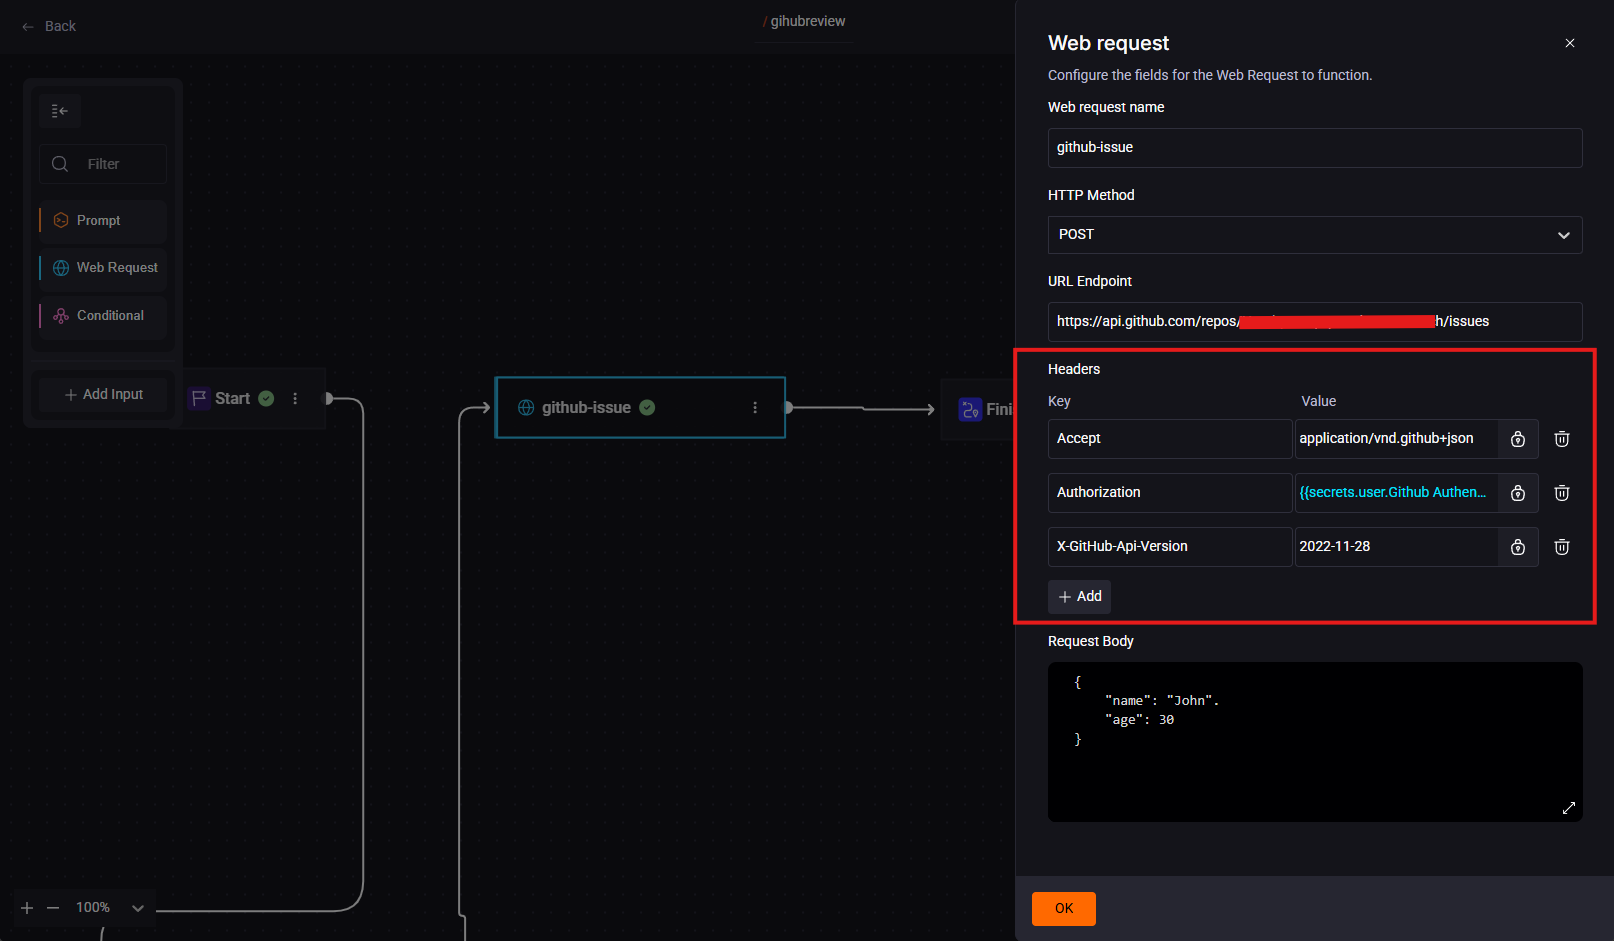
- Request Body: The body receives the response from the code review prompt you added earlier and replaces JSON using Jinja to perform actions:
{{ codereview.answer | replace("json","") | replace("```","")}}
Click 'Ok' to finish;
Step 2. Click on the 'Finish' card to open the 'Quick Command Utilization' options. Select the 'Interface' option;
- In the 'Final Result' field, delete any existing text and add the following text:
This code adds the GitHub issue URL to the responseIssue created on github!
{{github-issue.json.html_url}}
Step 3. Click ‘Ok’ and connect all the cards in the flow in sequence: Start > codereview > github-issue > Finish;
Step 4. Fill out the Quick Command Utilization. Choose how the user can interact with your Quick Command in the IDE, as follows:
-
Interface: The user runs the command, and the content is displayed in the sidebar of the StackSpot AI Extension.
-
Code: The user runs the command, and the content will be pasted directly into the code or:
-
Replace the selected code
-
Above the selected code
-
Below the selected code
-
Final result: This option shows the success message that the user will see when using your Quick Command. You can edit the message and also choose the utilization mode. See the example showing the URL to create a GitHub issue:
Final result
Insert { to view predefined input options or click on the tags:
select_mode, titulo_da_issue, summarize, propose_improvement;
-
Use chat context: This option uses previous Quick Command responses and interactions as context for subsequent interactions in a specific chat session. You can use this option to have a more coherent and contextually enriched experience in your interactions within the platform. StackSpot AI uses previous inputs and responses to inform and enhance your future commands and responses.
-
Step Context Sharing: When this option is enabled, each step can automatically access the data (variables and information) generated by previous steps. By default, context sharing is enabled.
- If you disable this option, each step will operate independently and will not have access to what was produced previously.
Example: - Step 1: "My profession is software engineer."
- Step 2: "What is my profession?"
- If context sharing is disabled, Step 2 will not know the answer.
- If you disable this option, each step will operate independently and will not have access to what was produced previously.
Your issue was successfully created at the following URL:
{{create_issue.json[0].url}}

Step 5. Click the 'OK’ button.
You can make changes to your Quick Command; just click in the 'Command Flow' area.
If your Quick Command encounters an error with the LLM provider—such as rate limit, timeout, or connection failure, StackSpot AI will automatically retry the call. Up to three additional attempts are made beyond the original call, totaling four attempts for each LLM step.
You cannot change or configure the number of retries.
When adding an external service URL, you may encounter issues with the API not accepting requests due to CORS (Cross-Origin Resource Sharing) restrictions.
To address this issue, you have two options:
APIs knowledge is necessary for both of these options. The process may be different based on your programming language, framework, or infrastructure.
Option 1. Add the StackSpot Front URL to the API
If you manage the API, you can configure it to accept requests from the StackSpot front URL. This will allow requests to proceed without any issues.
Option 2. Create a Middleware API
If you cannot modify the API configuration, consider creating a middleware API. In this scenario, the Quick Command (QC) will call your middleware API, which will handle CORS. The middleware will then make the necessary internal call to the intended external service.
The middleware or proxy is a common API that allows you to configure and enable CORS settings. Its primary function is to act as an intermediary, forwarding calls to the target API. API-to-API calls are not subject to CORS-related restrictions.
Here’s how the typical flow works:
- The Front End makes calls to the middleware or proxy API. At this stage, ensure that CORS settings are correctly configured in the middleware or proxy.
- The middleware or proxy API forwards the calls to the target API without needing additional CORS configurations since API-to-API calls do not face cross-origin restrictions.
How can I navigate every step of that creation flow?
When the response is a JSON, you can browse specific parts of the previous steps you did on the creation flow. You can work with the attributes, the values, etc. This step is essential because you can extract what the user needs. For example, a field of that service you created, a header, what was the status, etc.
If you need to know any value from the previous steps, add the information below:
1. Web Request See below a server that can return the following object format:
Headers: {"headers_name": "value", ...}
data: text
status: [200-599]
json: json - dictionary of the "data"
Example: {{create_issue.json[0].url}}
- If the data you receive is in JSON format, you can easily navigate through your data's values and attributes.
- The
jsonfield will be empty if it is not a JSON.
2. Prompt By default, you can navigate through the following fields:
prompt_tokens: string
completion_tokens: string
Example: {{my_prompt.answer}}
What can you do next?
1. Add Inputs
2. Share Quick Command
You can share the Quick Command you created with other users. This will enable direct use within the IDEs in the Account.
- On the 'Quick Commands' screen, click the share button on the left side of the StackSpot AI Portal to share.
Delete Quick Command (QC) linked to a Workspace
This action is irreversible.
Deleting a Quick Command (QC) with a linked Workspace or Studio may affect certain users. Follow these steps to delete:
- On left-side menu click ‘Quick Command’;
- Select the Quick Command you want to delete and click ‘Settings’;
- Click the ‘Delete’ button.