Create and Execute Remote Quick Commands
You can use the quick commands you’ve created in the StackSpot AI Portal beyond IDEs. These commands can help you use the StackSpot infrastructure, such as Workspaces, Stack AI, and Knowledge Sources, to accelerate GenAI use cases via API.
When used remotely, the Quick Commands should seamlessly leverage the StackSpot infrastructure, including Stack AI and Knowledge Sources. Additionally, remote quick commands support the handling of parameters, allowing you to input variables or arguments to customize the behavior of the commands.
The purpose of the Remote Quick Command is its use and integration with third-party software.
What’s the main difference between Quick Command IDE and Remote Quick Command?
Quick Command is a custom feature that works only on your IDE. You can use it by right-clicking your mouse. On the other hand, you can execute Remote Quick Command via API and generate payloads for external services through the internet. It is perfect for integrations and processing beyond the local environment.
Create a Remote Quick Command
Requirements
- Log in to your StackSpot AI Account.
- Set up your Personal Access Token.
- API Client: Install an API client like Postman or cURL to make API requests.
Step 1. Create a Remote Quick Command
1. Navigate to ‘Quick Command’;
2. Click ‘Create Quick Command’ and select the ‘Remote’ option; Fill in the required fields:
-
Quick Command Name: Add a descriptive name for your Quick Command.
-
Command (Slug): Define a unique slug for the command (e.g., my-remote-command); it should follow the slug pattern. For more information about Slugs, see the slug pattern.
-
Description: Provide a brief description of what the command does.
You can create a RQC using an available template or create one from scratch. It can be prompt or web request.
Prompt
Click on the Prompt box, drag it to the 'Start' box, and connect it using the line.
On the Prompt box, fill out the fields:
-
Prompt name: Add a slug identifier following the slug pattern.
-
Insert your prompt: Write down what you want your command to do. Include the Jinja variable
{{input_data}}to pass dynamic data. -
Select a Knowledge Source and/or an Agent.
-
Use the current Stack to generate code: This option depends on your needs.
- When enabled, it considers the context of your Stack and generates code based on whether you have a Java or Python Stack, for example. If you require code generation, then this option is recommended.
- However, if you need to generate text, like translations, it's best to refrain from enabling this option as it may not yield optimal results
-
Include the uploaded files: To allow the users to upload files in the specific step of the Quick Command, activate the Include Uploaded Files in each step you want. When this toggle is enabled, users can upload files during command execution.
-
Continue on error: Allows you to define the next step based on the success or failure of a step. This way, you control the Quick Command flow as needed.
- To configure, click on the prompt box and check the 'Continue on error' option. Click on 'Success' and connect the desired box. Do the same for 'Error'.
- You can handle errors by displaying the status, error message, or other information using Jinja variables in the Final Result field. For more details, access the documentation.
- If a step does not have this option enabled, any error will stop the Quick Command execution.
- If the option is enabled and an error occurs, the flow will follow the path defined for Error. StackSpot AI will only continue execution if an error flow is defined.
This option is available only for Prompt steps, not for Web Request ones.
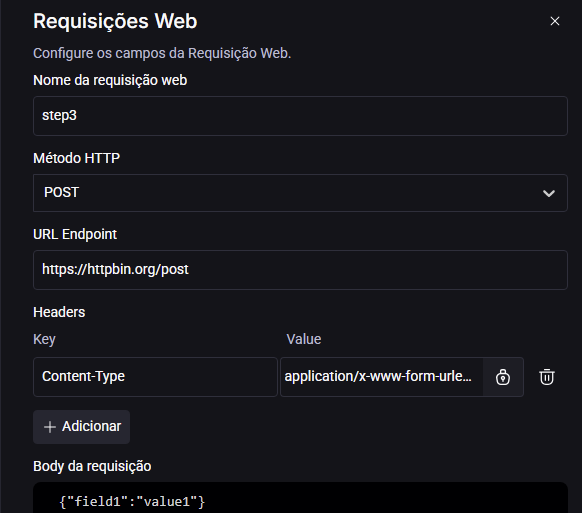
Web Request
Click on the Web Request box, drag it to the 'Start' box, and connect it using the line.
On the Web Request box, configure the URL, headers, and request body for an HTTP Request.
- Web request name: Add a request name following the slug pattern.
- HTTP Method: Choose a HTTP method.
- URL Endpoint: Add the Endpoint URL.
- Headers: Click on the 'Secret' button to create a secret:
- Click on the 'Add' button to add an existing secret. For more information, see the Secrets page.
- Request Body
Connectivity is limited to StackSpot AI, and your service is available online. When using a Quick Command in the IDE extension, the Web Request operates within it, enabling functionality on private networks. If this is your requirement, opt for the Quick Command IDE.
3. Click 'Finish' and fill out the Quick Command Utilization. Add:
{{the-name-of-yourQC.answer}}
It represents the expected result displayed in the service.
You can incorporate conditionals into your Quick Commands workflow. For more details, access the Conditional page.
Step 3. Execute the Remote Quick Command via API
You will execute the Remote Quick Command via API on the ‘How to use’ tab. Follow these steps:
3.1. Authenticate and obtain a Bearer Token
- Open your API client (e.g., Postman);
- Create a new POST request to the following URL:
POST https://idm.stackspot.com/stackspot/oidc/oauth/token
-
Add the following headers:
Content-Type: application/x-www-form-urlencoded -
In the request body, include your client credentials:
{
  "grant_type": "client_credentials",
  "client_id": "your_client_id",
  "client_secret": "your_client_secret"
}
- Send the request and copy the
access_tokenfrom the response.
3.2. Create an execution
- Create a new POST request to the StackSpot API endpoint for your Quick Command:
POST https://genai-data-integration-api.stackspot.com/v1/quick-commands/create-execution/{{quick_command_slug}}
-
Replace
{{quick_command_slug}}with the slug of your Quick Command (e.g., my-remote-command). -
Add the following headers:
- Authorization: Bearer
your_access_token - Content-Type: application/json
- In the request body, include the input data for the Quick Command:
{
  "input_data": "Your input data here"
  "execution_tag": "[Optional] Your tag here"
  "upload_ids": "List of uploads IDs"
}
input_data: This field defines the dynamic information or content you will process using your Quick Command. The value you enter here is a variable passed to the prompt or web request specified in your QC.execution_tag: This optional field enables you to assign a custom identifier to each Quick Command execution. Using this tag enhances usage tracking, analytics, and auditing by allowing you to effectively categorize according to specific tags or workflows.upload_ids: A list of the upload IDs generated when you upload files via the API.
- Send the request. The response will include an
execution_id.
3.3. Monitor execution status
- Create a new GET request to the following URL:
GET https://data-integration-api.stackspot.com/v1/quick-commands/callback/{{execution_id}}
Replace execution_id with the ID returned in the previous step.
- Add the following header:
- Authorization: Bearer
your_access_token
- Send the request. The response will include the execution status and result.
Monitor the response on the page for progress status, start and end times, duration, execution percentage, and status.
You will receive updates on the status at each step, including the final result, which you can use anywhere.
If your Quick Command encounters an error with the LLM provider—such as rate limit, timeout, or connection failure, StackSpot AI will automatically retry the call. Up to three additional attempts are made beyond the original call, totaling four attempts for each LLM step.
You cannot change or configure the number of retries.
What is the Content-Type header?
The Content-Type header in HTTP requests indicates the format of the data included in the request body. It informs the server about how to interpret the received data.
- Content-Type: This specifies the format of the data being sent.
- application/x-www-form-urlencoded: This is the standard format for transmitting form data, where key-value pairs are separated by an ampersand (&).
See an example below using Quick Command:
How to upload files in the Remote Quick Command
When a Remote Quick Command requires a file upload, you need to send the file to the StackSpot upload API. See the example below to authenticate, generate the upload form, and upload your file.
- Authenticate using your client credentials to obtain an access token:
curl --location 'https://iam-auth-ssr.stackspot.com/stackspot-dev/oidc/oauth/token' \
  --header 'Content-Type: application/x-www-form-urlencoded' \
  --data-urlencode 'client_id=<client_id>' \
  --data-urlencode 'grant_type=client_credentials' \
  --data-urlencode 'client_secret=<client-secret>' \
  -o auth.json}
- Generate upload form data Request the upload form data from the API. This will return the necessary fields and a URL for uploading your file.
curl https://genai-data-integration-api.stackspot.com/v2/file-upload/form \
  -H "accept: application/json" \
  -H "authorization: Bearer $(cat auth.json | jq -r .access_token)" \
  -H "content-type: application/json" \
  --data-raw '{"file_name":"teste.pdf","target_type":"CONTEXT","target_id":""}' \
  -o response.json
- Upload the file Use the returned URL and form fields to upload your file:
curl 'https://300543077521-genai-file-ingestor-v2-bucket.s3.amazonaws.com/' \
  -F key=$(cat response.json | jq '.form.key') \
  -F x-amz-algorithm=$(cat response.json | jq '.form."x-amz-algorithm"') \
  -F x-amz-credential=$(cat response.json | jq '.form."x-amz-credential"') \
  -F x-amz-date=$(cat response.json | jq '.form."x-amz-date"') \
  -F x-amz-security-token=$(cat response.json | jq '.form."x-amz-security-token"') \
  -F x-amz-signature=$(cat response.json | jq '.form."x-amz-signature"') \
  -F policy=$(cat response.json | jq '.form.policy') \
  -F file=@./teste.pdf
- Example API Response The API returns a JSON object with the upload information. Example:
{
    "id": "01K2000",
    "url": "https://300543077521-genai-file-ingestor-v2-bucket.s3.amazonaws.com/",
    "form": {
        "key": "01GR7B000/CONTEXT/01000/teste.pdf",
        "x-amz-algorithm": "AWS4-HMAC-SHA256",
        "x-amz-credential": "ASIA0000/2025/sa-east-1/s3/aws4_request",
        "x-amz-date": "20250818T",
        "x-amz-security-token": "0000=",
        "policy": "ey0000==",
        "x-amz-signature": "671593e000"
    }
}
- Remote Quick Command Rate Limit
There is a limit on the number of times you can use the Remote Quick Command within a 24-hour period. The limit varies based on the type of token you are using.
If you have already used it more than 100 times in the last 24 hours, you won't be able to use it again until the time limit has expired. In this case, you will receive an HTTP status 429 error. See an example below:
{
    "type": "TooManyRequests",
    "code": "CODEBUDDY_1044_QUICK_COMMAND_RATE_LIMIT_EXCEEDED",
    "details": "Maximum number of requests reached. Your limit is 100 requests in the last 1440 minutes"
}
Please wait until the time limit has expired before using the Remote Quick Command again.
- Service Credential: If you use a Service Credential for the account, you have a a limit of 20 requests per minute and up to 6,000 requests per day.
Only Account Holders can create Service Credentials and the limit is for the whole Account.
Share Quick Command
You can share the Quick Command you created with other users. This will enable direct use within the IDEs in the Account.
- On the 'Quick Commands' screen, click the 'Share' button.
For more information about sharing content, see the Personal Content page