IDE Quick Command Examples
Example 1. Create a Translation Quick Command
I want to select a line of code in Portuguese and translate it to English.
Step 1. Access the StackSpot AI Portal. Click the ‘Quick Command’ section;
Step 2. Click the ‘Create Quick Command’ button. In the 'Choose the type of Quick Command you want:' menu, select 'IDE';
Step 3. Enter a name and description for your Quick Command, then click 'Next';
Step 4. In 'Select a template or create from scratch', click 'Blank' and then the 'Create' button;
Step 5. Click on the 'Prompt' option. Fill in the fields:
- Prompt name: translate-eng
- Insert your prompt:
Translate the following extract (do not explain, do not add examples, only translate to English) {{selected_code}}
Do not select ‘Use the current stack to generate code’. You only need a text translation.
- Click ‘Ok’;
Step 6. Click the 'Finish' card to open the 'Quick Command Utilization' options. Select the 'Code' option;
Step 7. In the 'How will the code be inserted?' option, select 'Replace the selected code';
- In the 'Final Result' field, delete any existing text and click the variable with your prompt name to add it to the final result. Or insert it manually as in the example below:
{{translate-eng.answer}}
Step 8. Click ‘Ok’ and connect all the cards in the flow in sequence: Start > translate-eng > Finish;
Step 9. Access your IDE and test it:
- Select a text in English
- Right-click, then choose StackSpot AI > My quick commands > Your Quick Command Name.
Example 2. Create a GitHub Issue Quick Command
Follow the steps to create a Quick Command that opens a GitHub issue.
Step 1. Go to the StackSpot AI Portal. Click the ‘Quick Command’ section;
Step 2. Click the ‘Create Quick Command’ button. In the 'Choose the type of Quick Command you want:' menu, select 'IDE';
Step 3. Enter a name and description for your Quick Command, then click 'Next';
Step 4. In 'Select a Template or Create from Scratch', click 'Blank' and then 'Create';
Step 5. Click the 'Prompt' option. Fill in the fields:
- Prompt name: codereview
- Insert your prompt:
Act as a senior software engineering leader with decades of experience leading and mentoring software engineering teams. Respond in a direct, helpful, concise, and non-repetitive way. You will see the source code I wrote, and I want you to comment on it based on software engineering best practices (such as SOLID principles, clean code, and other well-known standards) and our policy that I will provide. Return your answer in the "GitHub-issue" format. In bullet points, fill the body field with your response in Markdown format compatible with GitHub issue format. Fill the title field with an objective summary of your response. Set the labels field to "bug".

Example:

{
"title": "Issue title",
"body": "Detailed issue description.",
"labels": ["bug", "api"]
}

code: {{input_data}}
Click 'Ok' to finish.
Step 6. Click ‘Web Request’, then click the added Step card and fill in the fields:
- Web request name: github-issue
- HTTP Method: POST
- URL Endpoint: This is a GitHub API that uses your repository. Replace
{OWNER_REPO}/{REPO_NAME}with your username or organization and the repository name where you want to open the issue:https://api.github.com/repos/{OWNER_REPO}/{REPO_NAME}/issues - Headers:
For this request, generate a fine-grained Personal Access Token (PAT) in your GitHub profile under ‘Developer settings‘ and grant the necessary permissions to interact with repositories. Then, create a Secret in StackSpot or select an existing secret in your account to use in the 'Key' and 'Value' fields.
For example, if you create a Secret named github with the Key MY_TOKEN and set the value to your PAT, selecting the Secret in StackSpot will include it as:
- Key: MY_TOKEN
- Value:
{{secrets.user.github.MY_TOKEN}}(Personal Secret format)
So, in your request header, set Authorization as 'Value' to the variable {{secrets.user.github.MY_TOKEN}}.
Fill in the 'Headers' by entering the 'KEY' and 'VALUE' fields as shown below:
Do not use quotes when filling in the Headers.
{
   "Accept": "application/vnd.github+json",
   "Authorization": "Bearer <ADD_YOUR_TOKEN>",
   "X-GitHub-Api-Version": "2022-11-28"
}
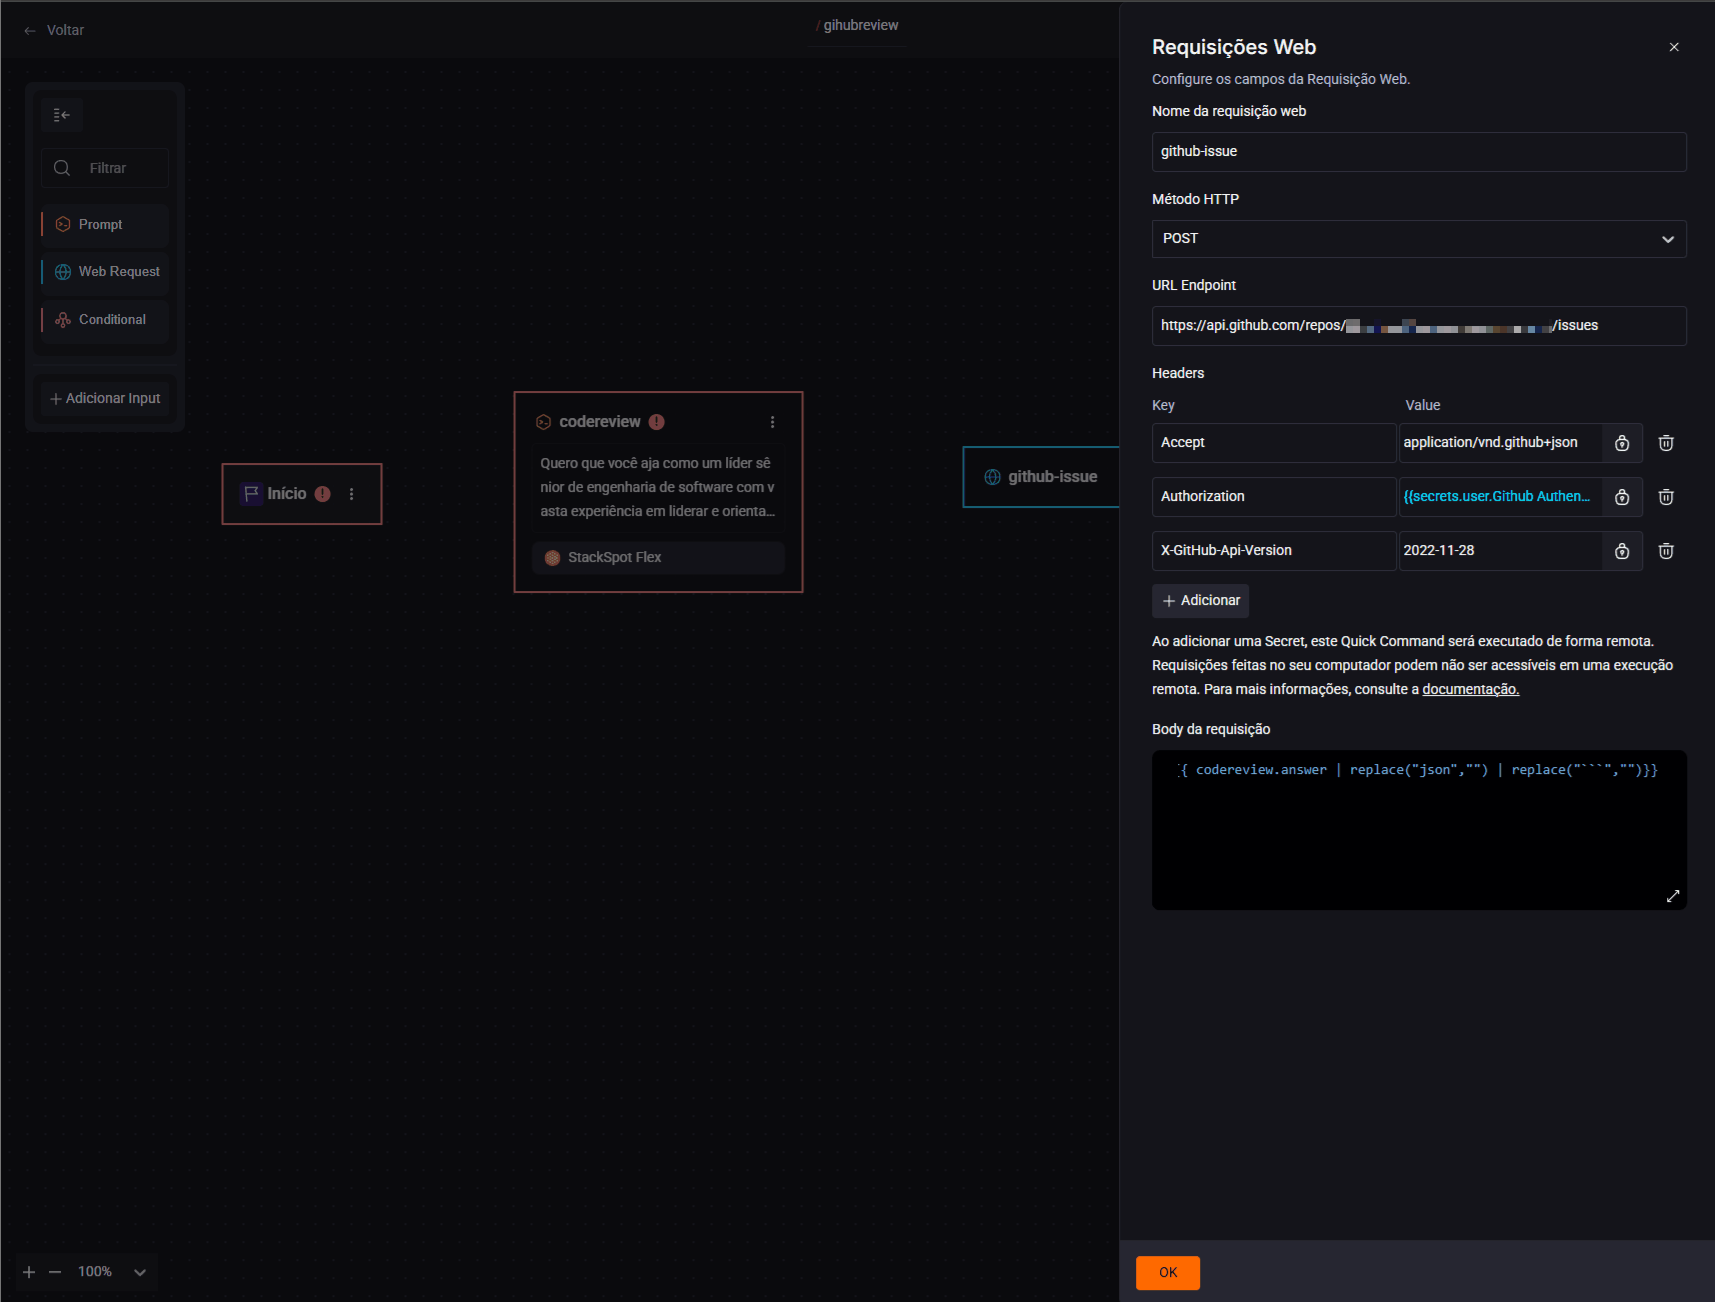
- Request Body: The body receives the code review prompt answer you added earlier and uses Jinja to replace JSON and perform actions:
{{ codereview.answer | replace("json","") | replace("```","")}}
Click 'Ok' to finish.
Step 6. Click the 'Finish' card to open the 'Quick Command Utilization' options. Select 'Interface'.
- In the 'Final Result' field, delete any existing text and add the following:
This code adds the GitHub issue URL to the responseIssue created on github!
{{github-issue.json.html_url}}
Step 7. Click ‘Ok’ and connect all the cards in the flow in this order: Start > codereview > github-issue > Finish.
Step 8. Open your IDE and test it:
- Select a code snippet for review
- Right-click, then choose StackSpot AI > My quick commands > Your Quick Command Name
Learn more
- For more information, see the Quick Command page.